Python and the Game Engine
This whole chapter is organized into three main parts: why, what, and how. Thus, if you have read from the beginning, you already have solid reasons to start using scripts for your project, and you understand what Python is. The final part of this chapter will cover how to use your Python knowledge inside the game engine. This part is divided into four submodules:
Integrating Python in the game engine.
Writing your Python scripts.
Designing your script.
Using the Game Engine API.
Integrating Python in the Game Engine
In the game engine, the script interface is controller-centric by design. Therefore, you can consider the Python script simply as a more complex controller to replace the Expression or the Boolean controllers. In those cases, the script will be responsible for controlling how the sensors are related with the actuators of a given object. In fact, the sensors, actuators, and even the object where you are calling the script from are all attributes of the controller.
As we mentioned earlier, with a Python script you can control external devices, control multiple objects at once, and much more. However, you will never be free from using a logic brick framework. And from the combination of logic bricks, individual sensors, global sensors, and actuators, the elegance of your system will arise.
In the first example, you will find a very simple case study of how to make your Python controller work. It will cover the basic behavior of receiving sensors’ input in the script and triggering actuators from it.
Download the example 003_template.zip, extract it and load the abracadabra.blend file.
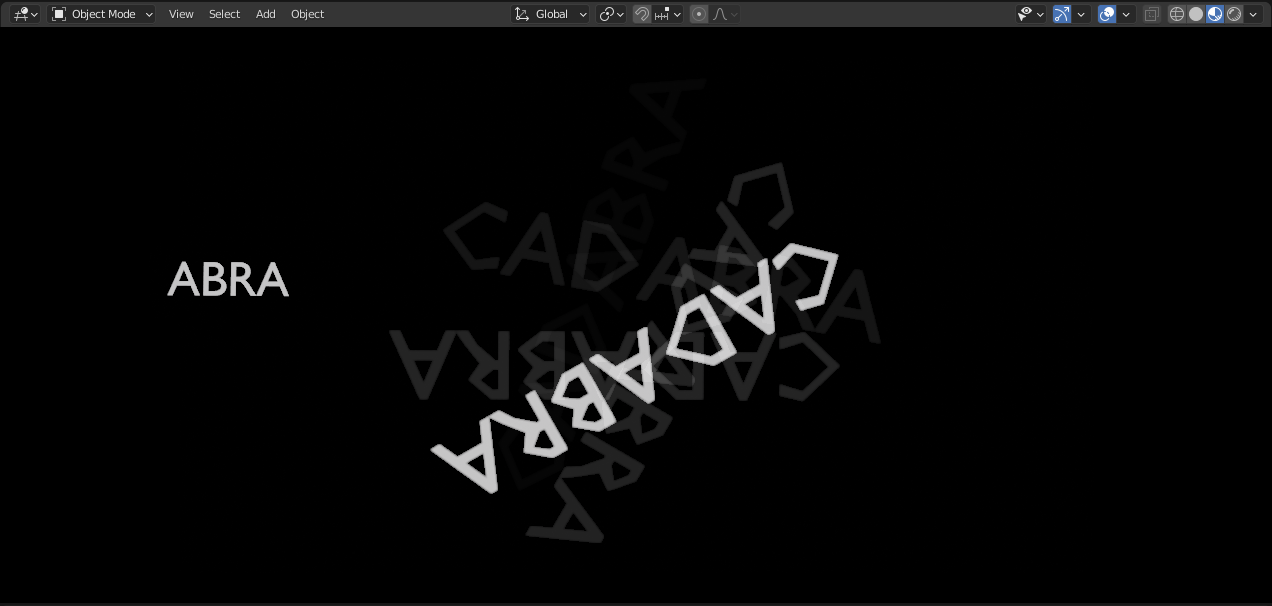
Abracadabra
Launch the game and keep the spacebar pressed. In above figure, you can see the result before and after you press the key. Can you read the spinning text? It may not be impressive, but it certainly is didactic. Here is the script behind this effect:
import bge
from bge import logic

# Use bge module to get/set game property + transform
cont = logic.getCurrentController()
owner = cont.owner
scene = logic.getCurrentScene()
objects = scene.objects
font_object = objects["Text"]

# Use bpy.types.TextCurve attributes to set other text settings (size, body, etc)
font_object_data = font_object.blenderObject.data

sens = cont.sensors['my_sensor']
act = cont.actuators['my_actuator']

if sens.positive:
  cont.activate(act)
  font_object_data.body = "CADABRA"
  font_object_data.size = 2
  font_object_data.resolution_u = 1
else:
  cont.deactivate(act)
  font_object_data.body = "ABRA"
  font_object_data.size = 1
  font_object_data.resolution_u = 4
This script is triggered from a keyboard sensor, runs from a controller in the camera object, activates an actuator in the camera itself, and changes a property in the text object. Next figure shows logic bricks for this one.
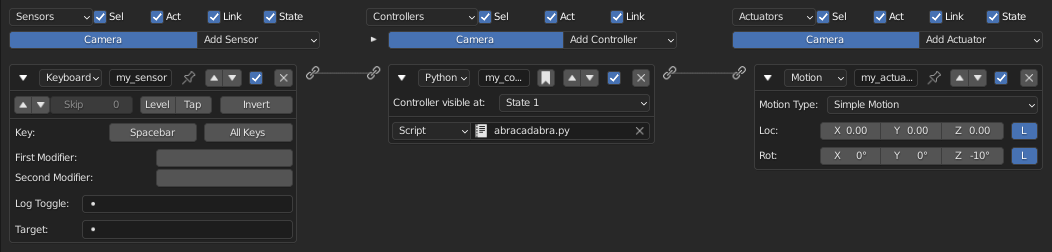
Simple logic bricks with a Python controller
Let’s look at it from the beginning:
import bge
from bge import logic
The first lines import the module bge and then the submodule logic. No big deal here. We actually don’t need to explicitly import the bge module since we are importing a submodule directly. However, it doesn’t hurt to do it. Lines 4 and 5 will store the current controller in a variable and create a pointer to the object where it was called from (known as _owner_). We are not using the owner variable here, but it’s good to be familiar with it. You will be using it a lot.
# Use bge module to get/set game property + transform
cont = logic.getCurrentController()
owner = cont.owner
The following lines get more elements from the game to be used in the script: scene will give you direct access to the current scene; objects is the current list to be used later; font_obj is one element of the objects list (accessed by its name in Blender).
scene = logic.getCurrentScene()
objects = scene.objects
font_obj = objects["Text"]
In the above code we used the bge module to get the font game object but using the bge module only we are limiting us to get/set the game object plus to make transforms with this game object (position, rotate or scale). Whether we want to access to the inner parts of the Text object and modify them then we need to understand that the Text object is a bpy object (type TextCurve) and we need to adquire its bpy object data. Once adquired we can use all the properties of bpy.types.TextCurve class.
# Use bpy.types.TextCurve attributes to set other text settings (size, body, etc)
font_object_data = font_object.blenderObject.data
Remember when we said that the game engine is controller-centric? All the sensors and actuators are accessed from the controller, not from the object they belong to (its owner), as you might expect. Lines 11 and 12, respectively, read the built-in sensor and actuator list to get the ones we are looking for.
sens = cont.sensors['my_sensor']
act = cont.actuators['my_actuator']
In a way similar to how logic bricks work, we are going to activate the actuator if the sensor triggers positive and deactivate it otherwise. The deactivation happens in the frame after the sensor ceases to validate, for example, the key is unpressed or the mouse button is released.
if sens.positive:
   cont.activate(act)
else:
   cont.deactivate(act)
We are not restricted to controlling only actuators, though. Lines 19-21 and 24-26 change the text, the size and the resolution of the object when you press/release the spacebar:
font_object_data.body = "CADABRA"
font_object_data.size = 2
font_object_data.resolution_u = 1

font_object_data.body = "ABRA"
font_object_data.size = 1
font_object_data.resolution_u = 4
This file can be simple, but holds the essence of the game engine architecture design. Now is a good time to go over the other game engine template files that come with the example 003_template.zip and spend some time studying those examples.
Writing Your Python Scripts
If you haven’t started your own scripts, now is a good time to do so. You will need a text editor, the API modules documented, and a good way to test your files.
Text Editors
It’s important to find a script editor that you find pleasant to work with. The most important features you will be looking for are: syntax coloring and highlighting, auto indentation, and auto completion. You can find editors with even more features than these, so experiment with different alternatives and decide what’s best for you.
UPBGE Text Editor
As you probably know, UPBGE has its own internal text editor (see next figure). Although it may not be as powerful as software designed exclusively for this particular task, it can be very convenient. It’s useful for quick tests, small scripts, or when you want to keep everything bundled inside the Blender file. Here are its main features:
Syntax highlighting;
Dynamic font sizes;
Indentation conversion (spaces to tabs and vice versa);
Line counting and navigation;
Search over multiple internal files;
Sync with external files;
Icon viewer (small but marvellous feature to get what is the icon that you want to use).
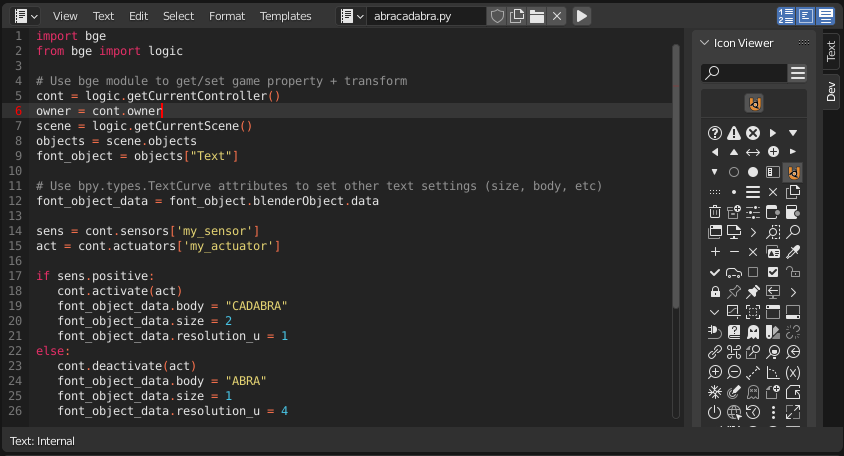
UPBGE internal text editor
Visual Studio Code or PyCharm
External editors as Visual Studio Code or PyCharm have many more features than internal UPBGE Text editor. The weakest point of using external editors is the auto-completion and the documentation visualization directly from the code.
Using a Python API stub generated from UPBGE .rst documentation can solve both issues. In the API Stubs chapter you can see how install the upbge-stubs package to improve the external editor experience.
Reference Material and Documentation
Since the UPBGE game engine Python API is available online, you have an official excuse to keep a Web browser open while you work. It’s not a bad idea to keep an offline version of it, too. Use it when you need to be more productive and the Internet is getting in your way (as in, always).
It’s good if you can start to gather example materials from the Internet and keep them organized. If you use the append feature in Blender to navigate to and import text files from your “collection”, you will not even need to open another Blender application. Also, if you are consistent with your naming style, indentation rules, and file structures, you will find easy to reuse your own scripts.
Testing Your Scripts
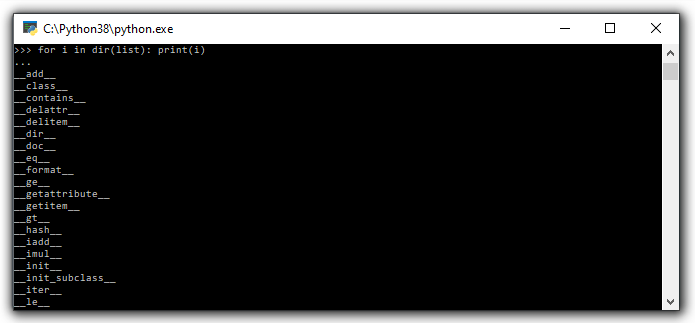
It doesn’t matter how easy Python is, you will spend evenings testing and retesting your scripts before you have them working properly. The more complete way to test your script is to play it inside the game engine. However, you may not want to load your game every time you need to be sure of some Python syntax, data types’ built-in functions, or simply to check if the math of a result is correct.
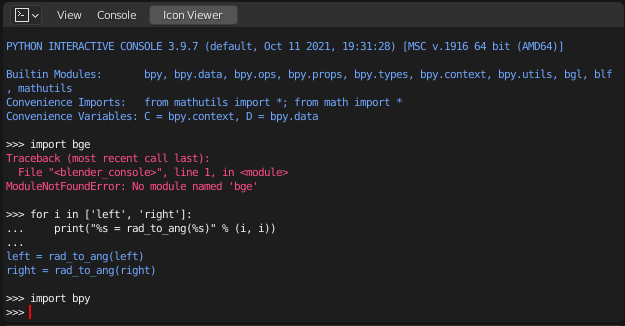
In those cases, you can use an interactive interpreter to help you. If you have Python installed on your system, you have it already. If you are using Windows, this will be the python.exe application in your Python installation directory (C:Python39by default, considering the installation of Python 3.9), as seen in Figure 7.8. In Linux or OSX, you have to type “python” in any console and you are good to go.
Python IDE
You can also use the UPBGE Python console. Change one of your current windows into the console, and you should see the screen shown in the next figure.
UPBGE Python console
Now you can use it to type simple codes, or to run a help or a dir into any of the Python modules. Unfortunately, only Blender modules have the auto-complete working from there.
Additionally, you can also use the in-game python console for debugging the game from python. In the scene properties tab you can activate it and set-up its short-cut.

Set-up In-game UPBGE Python console
To activate it, once the game has started you have to press the short-cut. Then the game will be paused and in the Windows console or linux terminal you will see the interactive python console, as you can see in the next figure. Whether you want to continue the game you need simply ending the interpreter, for Linux Ctrl-D and for Windows Ctrl-Z > Enter.
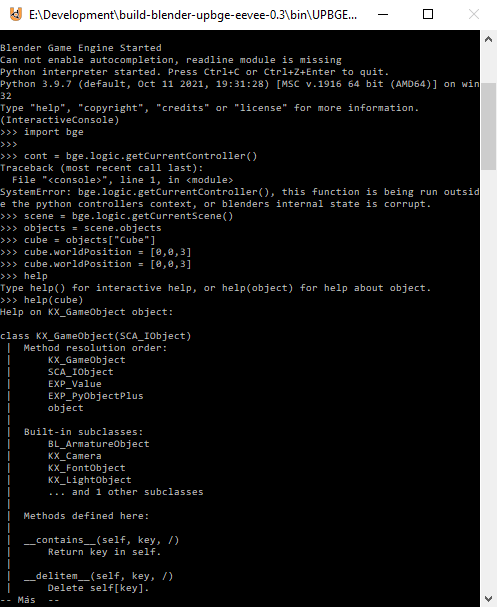
In-game UPBGE Python console
Another important strategy is to keep the development of new functionalities outside the main file. For example, if you need to develop a navigation system (as we will soon), you don’t need to use your real big, high-textured scenario. Definitively not for the early tests. If you keep independent systems that work together, you will be able to identify errors faster and easier and even to port fixes over to other projects smoothly.
Designing Your Python Script - Study Example
We are now going to dive into an example of writing and planning a Python script for the game engine from scratch. We will assume that you have already covered all the basics of Python scripting and the general understanding of game engine internals so we can move on to its real usage. More specifically, we are going over the writing process of a camera navigation system for an architectural visualization walkthrough. This study case is actually the system developed for a commercial project for an Italian book project. In general, we needed to implement a system to navigate and interact in a virtual model of an Italian Doric temple. Here, however, we are going to develop it under a sandbox and reapply it into another file, emulating what you could do with your own projects.
Unlike gaming cameras, a virtual walkthrough can use a very simple navigation system compound of (1) an orbit mode to look at the exterior of the building; (2) a walk mode to navigate inside the building with gravity simulation and collision; (3) and a fly mode to freely explore the virtual environment with collision only. The other requirement was to make the system as portable as possible, and with the least amount of logic bricks.
All of those aspects must be considered from the first phases of the coding process. With a well-defined design, you can plan the most efficient system in the short and long run.
Note
Pencil and Paper, Valuable Coding Assets
It doesn’t matter how advanced and technical the coding is that you are working on; you can always have a great time sketching your ideas and plans with old-fashioned pencil and paper. This is how the problems are solved, clearly laying down the ideas and organizing them logically.
The system will consist of one camera for the orbit mode, and one to be used for both the fly and walk mode. Each mode works as described in the following table:
Mode |
Orbit |
Walk |
Fly |
|---|---|---|---|
Vertical Rotation Angle (Z) |
-200º to 200º |
Free |
Free |
Horizontal Rotation Angle (X) |
10º to 70º |
-15º to 45º |
Free |
Moving Pivot |
None |
Empty |
Empty |
Horizontal Rotation Pivot |
Empty |
Empty and Camera |
Camera |
Vertical Rotation Pivot |
Empty |
Empty |
Empty |
Empty: is an empty object the camera is parented to.
Note
Try It Out
In order to illustrate it better, you can see the working system demonstrated in the book file: BookChapter74_navigation_systemcamera_navigation.blend. To switch modes press 1, 2, or 3. This will change the mode to orbit, walk, and fly, respectively. To navigate, you can use the mouse and the keys W A S D.
3D World Elements
Open up the file BookChapter74_navigation_systemcamera_navigation.blend.
You will find two cameras and different empty objects in the first layer:
scripts - an empty to calls all the scripts.
CAM_Move - the camera for the walk and fly mode.
CAM_Orbit - the camera for the orbit mode.
CAM_back, CAM_front, CAM_side, CAM_top - empties to store the position and orientation for the game cameras.
MOVE_PIVOT - the pivot for the walk and fly camera.
ORB_PIVOT - the pivot for the orbit camera.
In the second layer, you will find the collision meshes[md]the ground and the vertical elements. Everything is very simple here, since we only need to test the system, and for that a few low poly obstacles work fine.
Understanding the Code
/Book/Chapter7/4_navigation_system/camera_navigation.py
This program is divided into five different parts:
Global Initialization;
Event Management;
Internal Functions;
Game Interaction;
More Python.
The diagram in Figure 7.10 illustrates how they relate to one another. Now let’s take an inside look at each of them.
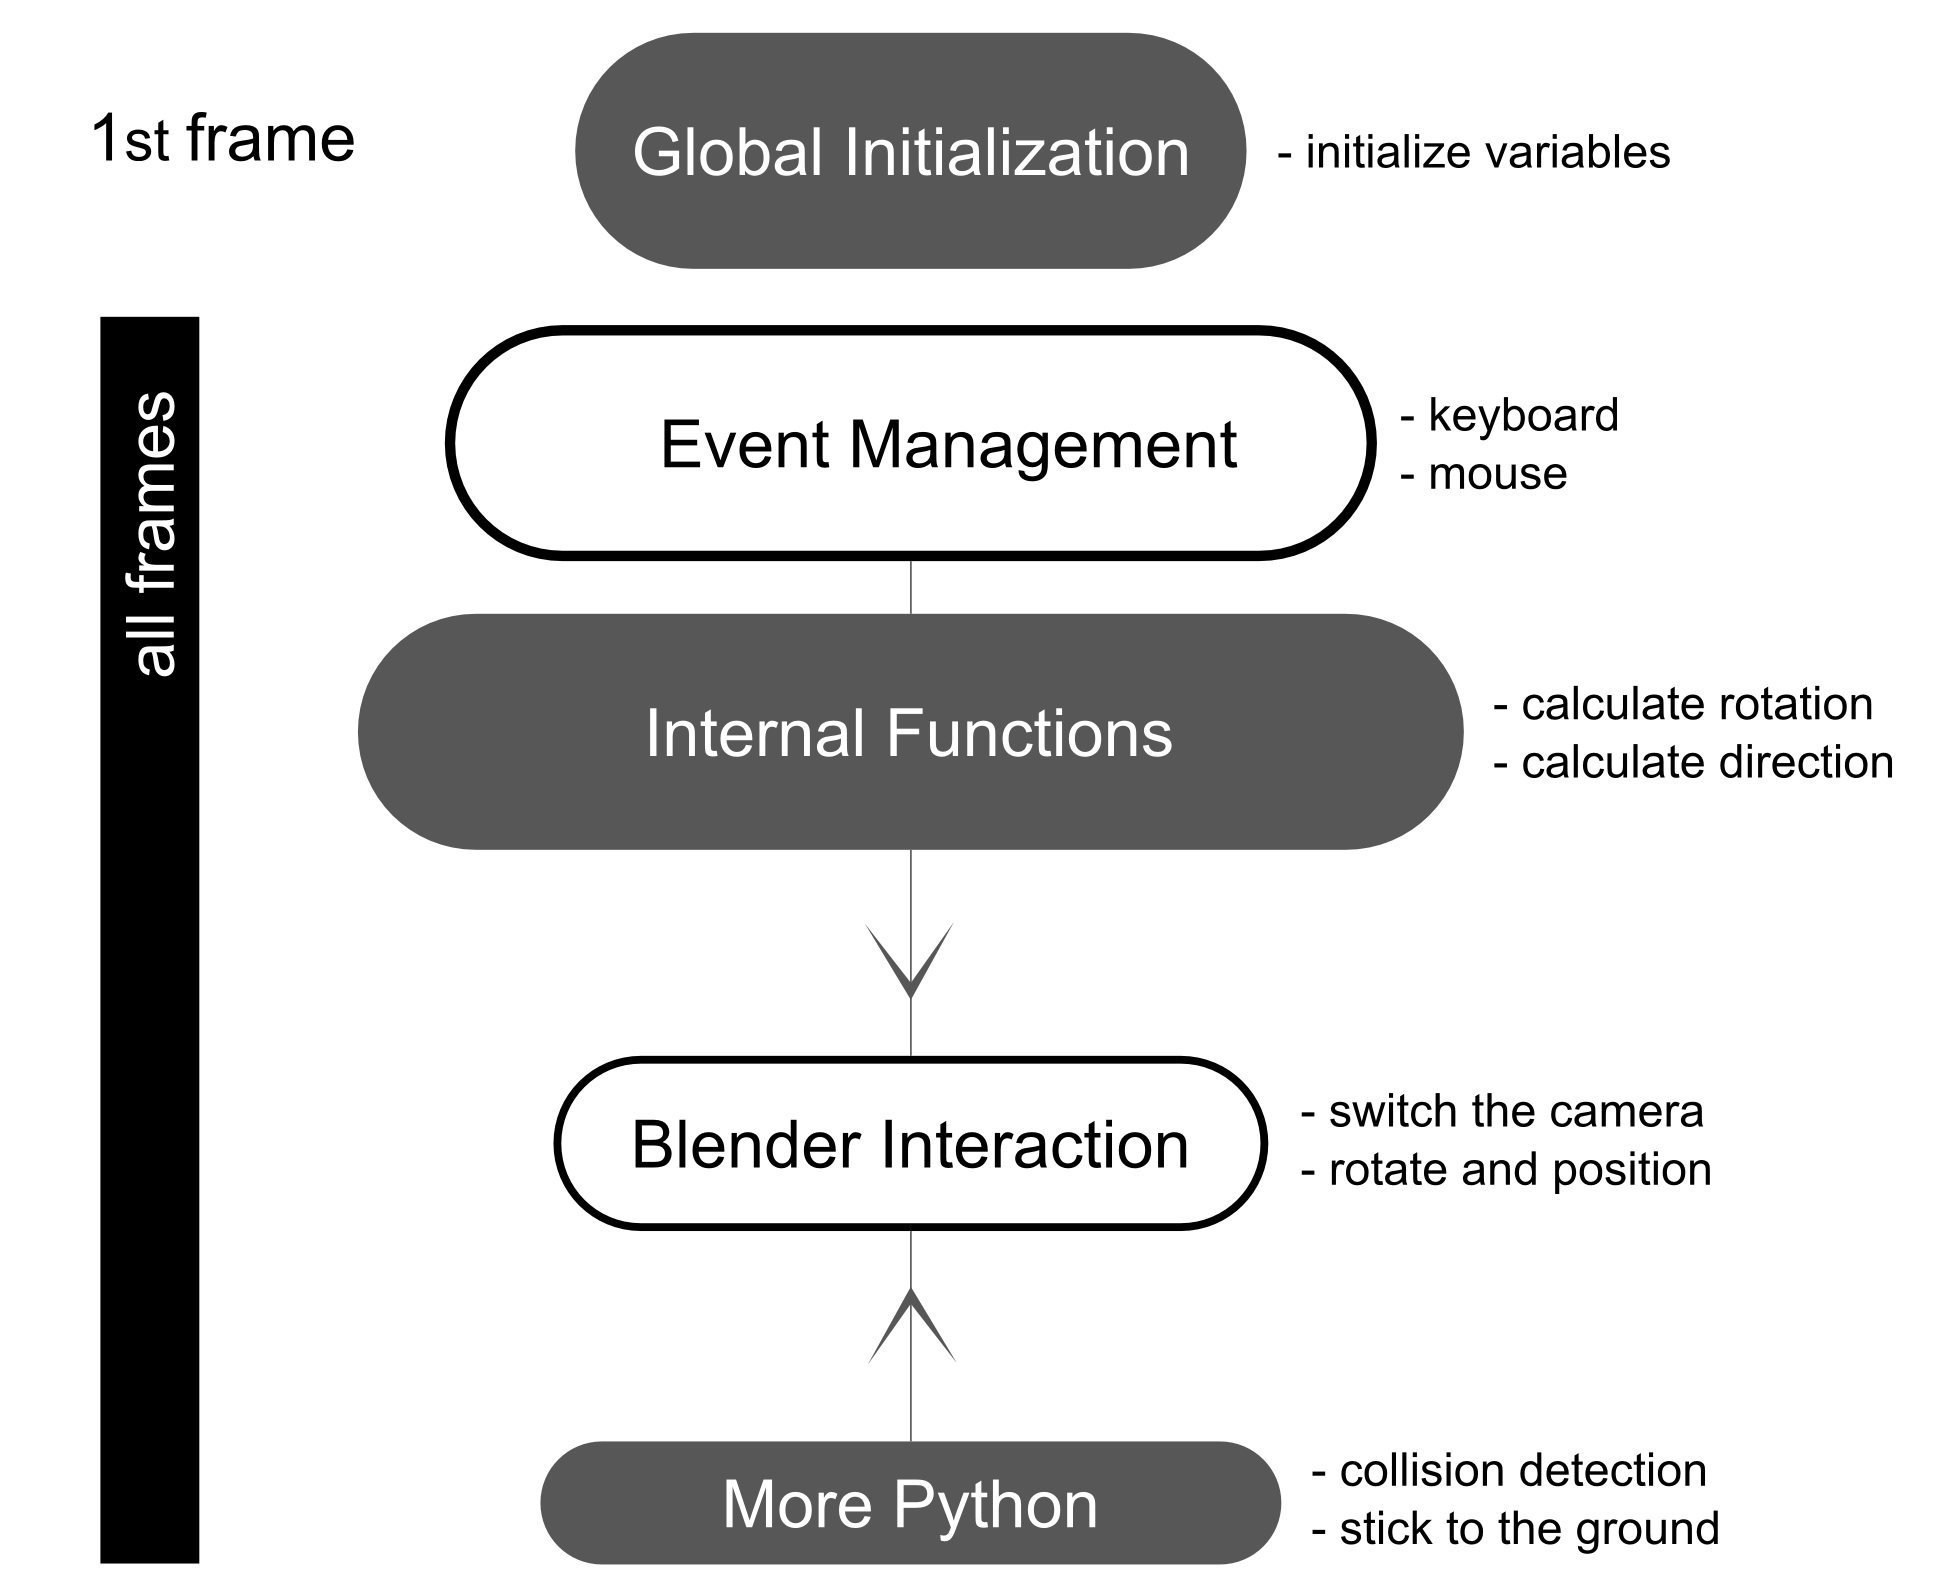
Script architecture
Global Initialization
camera_navigation.init_world()
There is one function that is loaded once at the beginning of the game; we call it init_world inside scripts.py. We are going to check the priority option in the Python controller to make sure this script runs on top of all the others. In this function, you will first find the global initialization. We are going to store in the global module logic all the elements we are going to reuse over the scripts. That way we don’t need to get the object list every time we need a particular object. A common technique is to store the scene object as well. Therefore, for every scene, you can run a script at the beginning of the game that stores a reference to the current scene globally:
33 G.scenes = {"main":G.getCurrentScene()}
34 objects = G.scenes["main"].objects
Note
Save and Load a game with GlobalDict
Since the module logic is accessible from all the functions and all the scenes, it can be used to store “global” objects. If you need to preserve those objects and variables between game sessions (i.e., after you close your game), you can store them inside the dictionary logic.globalDict and use logic.saveGlobalDict() and logic.loadGlobalDict() to save and load it.
To store the camera information, we are first going to create a global dictionary named cameras. We will use it to store the camera objects, their pivot, and the original orientation of the orbit pivot:
43     G.cameras = {}
44     # orbit camera
45     camera = objects["CAM_Orbit"]
46     pivot = objects["ORB_PIVOT"]
47     G.cameras["ORB"] = [camera, {"orientation":pivot.worldOrientation}, pivot]
48     # fly/walk camera
49     camera = objects["CAM_Move"]
50     pivot = objects["MOVE_PIVOT"]
52     G.cameras["MOVE"] = [camera, {"orientation":pivot.worldOrientation, "position":pivot.worldPosition}, pivot]
Now that we have our objects instanced, we can set the initial values for our functions, such as the camera rotation restrictions. We don’t want the cameras to look under the ground; thus, we need to manually set our limits. Although we could set those limits directly in the orbit and look functions, having all the parameters in the same part of code is easier to tweak (and slightly faster since they don’t need to be reassigned every frame).
Note
External Settings File
Another common workflow is to have a separate python file (for example, settings.py) with all the variables set. Then in your working script, you simply have to do: import settings.py and use e.g. settings.left.
       # Camera Orbit settings:
58     # angle restriction in degrees
59     left = -220.0
60     right = 220.0
61     top = 70.0
62     bottom = 10.0
63
64     # convert all of them to radians
65     left = m.radians(left)
(...)
70     # store them globally
71     G.orb_limits = {"left":left, "right":right, "top":top, "bottom":bottom}
72
       # Camera Walk/Fly settings:
(...)
Last, but not least, we need to create the variables we are going to read and write between the functions. Initializing them here allows us to read them since the first frame of the game. This is especially important for variables that are going to be used in the event management functions - for different values of nav_mode and walk_fly, we are going to run different functions for the camera movement.
103 G.walk_fly = "walk"
104 G.nav_mode = "orbit"
Event Management
camera_navigation.mouse_move
camera_navigation.keyboard
Apart from the Always sensor needed for the camera_navigation.init_world() function, there are two other sensors we need - a keyboard and a mouse sensor. All the interaction you will have with this navigation system will run through those functions.
scripts.mouse_move
Let’s first take a look at the mouse sensor controlling system:
210 def mouse_move(cont):
211     owner = cont.owner
212     sensor = cont.sensors["s_movement"]
213
214     if sensor.positive:
215         if G.cameras["CAM"] == "ORB":
216             orbit_camera(sensor)
217         else:
218             look_camera(sensor)
It looks quite similar to the script template we saw recently. A difference is that instead of activating an actuator, we are calling a function to rotate the view. Actually, according to the current camera (orbit or fly/walk), we will have to call different functions (orbit_camera and look_camera respectively). Also, you can see that the function gets the controller passed as an argument. The game engine passes the controller by default for the module when using the Python Module controller. The argument declaration in the function is actually optional. So you could replace line 210 of the code with the following two lines, and it would work just as well:
def mouse_move():
    cont = G.getCurrentController()
scripts.keyboard
The second event management function handles keyboard inputs. This function takes the sensor input and calls internal functions according to the pressed key. If the pressed key is W, A, S, or D, we move the camera. If the key is 1, 2, or 3, we switch it.
110 def keyboard(cont):
111     owner = cont.owner
112     sensor = cont.sensors["s_keyboard"]
113
114     if sensor.positive:
115         keylist = sensor.events
117         for key in keylist:
118             value = key[0]
119
120             if G.cameras["CAM"] == "MOVE":
121                 if value == GK.WKEY:
122                     # Move Forward
123                     move_camera(0)
124                elif value == GK.SKEY:
125                    # Move Backward
126                     move_camera(1)
127                 elif value == GK.AKEY:
128                     # Move Left
129                     move_camera(2)
130                 elif value == GK.DKEY:
131                     # Move Right
132                     move_camera(3)
133
134            # CAMERA SWITCHING
135            if value == GK.ONEKEY:
136                change_view("orbit", "orbit")
137            elif value == GK.TWOKEY:
138                change_view("front")
139            elif value == GK.THREEKEY:
140                change_view("top", "fly")
(...)
Note
For a World with Fewer Logic Bricks
If you don’t want to use a keyboard sensor, you can use an internal instance of the keyboard module. You can read about this in the “bge.logic API” section later in this chapter, or on the online API page: _http://www.blender.org/documentation/blender_python_api_2_66_release/bge.logic.html#bge.logic.keyboard._
Internal Functions
scripts.move_camera
scripts.orbit_camera
scripts.look_camera
These three functions are called from the event management functions. In their lines, you can find the math responsible for the camera movement. We’re calling them “internal functions” because they are the bridge between the sensors’ inputs and the outputs in the game engine world.
scripts.move_camera
The function responsible for the camera movement is very simple. In the walk and fly mode, we are going to move the pivot in the desired direction (which is passed as argument). Therefore, we first need to create a vector to this course. If you are unfamiliar with vectorial math, think of vector as the direction between the origin [0, 0, 0] and the vector coordinates [X, Y, Z].
336 def move_camera(direction):
338     if not G.cameras["CAM"] == "MOVE": return
339     MOVE = 0.25 # speed
340
341     if direction == 0: # Forward
342         vector = M.Vector([0, 0, -MOVE])
344     elif direction == 1: # Backward
345         vector = M.Vector([0, 0, MOVE])
347     elif direction == 2: # Left
348         vector = M.Vector([-MOVE,0,0])
350     elif direction == 3: # Right
351         vector = M.Vector([MOVE, 0, 0])
(...)
356     # now that we calculated the vector we can move the pivot
357     # to be continued in the Game Interaction section
Here the vector is the movement we need to apply to the pivot in order to get it moving. The size of the vector (MOVE) will act as intensity or speed of the movement.
scripts.orbit_camera
We decided to use different methods for the walk/fly camera and the orbit one. In the orbit camera, every position on the screen corresponds to an orientation of the camera.
If you want to study this part of the script in particular, you can turn on the Mouse Cursor in the Render Panel. That way, you can see that the same cursor position will (or should) always generate the same view.
224 def orbit_camera(sensor):
228     # Get screen size, attributes from the sensor and global variables
229     screen_width = R.getWindowWidth()
230     screen_height= R.getWindowHeight()
231
232     win_x, win_y = sensor.position
233
234     # G.orb_clamp is in radians
235     orb_limits   = G.orb_limits
236     left_limit   = orb_limits["left"]
237     right_limit  = orb_limits["right"]
238     bottom_limit = orb_limits["bottom"]
239     top_limit    = orb_limits["top"]
240
241     # Normalizing x to run from left to right limits
242     x = win_x / screen_width
243     x = left_limit + (x * (right_limit - left_limit))
244
245     # Normalize y to run from top to bottom limits
246     y = win_y / screen_height
247     y = top_limit + (y * (bottom_limit - top_limit))
248
249     # Flip the vertical movement
250     y = m.pi/2 - y
251
254     # Calculate the new orientation matrix
255     mat_ori = G.cameras["ORB"][1]["orientation"]
256
257     mat_x = M.Matrix.Rotation(x, 3, 'Z')
258     mat_y = M.Matrix.Rotation(y, 3, 'X')
259
260     ori = mat_x * mat_y
261
262     # now we can use ori as our new orientation matrix
264     # to be continued in the Game Interaction section
(...)
The first lines that deserve our attention here are the normalizing operation. To normalize a value means to convert it to a range from 0.0 to 1.0. In our case, it can be understood as the mouse pointer coordinates relative to the screen dimensions (width and height):
242 x = win_x / screen_width
Note
Even Fewer Logic Bricks and Normalized Mouse Coordinates
It’s important to always use normalized coordinates for your screen operations. Otherwise, different desktop resolutions will produce different results in a game. As a counter edge case, you may need the absolute coordinates for mouse events if you want to assure minimum clickable areas for your events. You don’t always need to normalize the mouse coordinates manually. Like the keyboard sensor, you can replace the mouse sensor by an internal instance of the mouse module. The coordinates from bge.logic.mouse run from 0.0 to 1.0 and can be read anytime. (You can even link your script to an Always sensor, leaving the Mouse sensor for the times where you are using more logic bricks.) You can read about this in the “bge.logic API” section in this chapter or on the online API page: _http://www.blender.org/documentation/blender_python_api_2_66_release/bge.logic.html#bge.logic.keyboard_
Now a simple operation to convert the normalized value into a value inside our horizontal angle range (-220º to 220º):
243 x = left_limit + (x * (right_limit - left_limit))
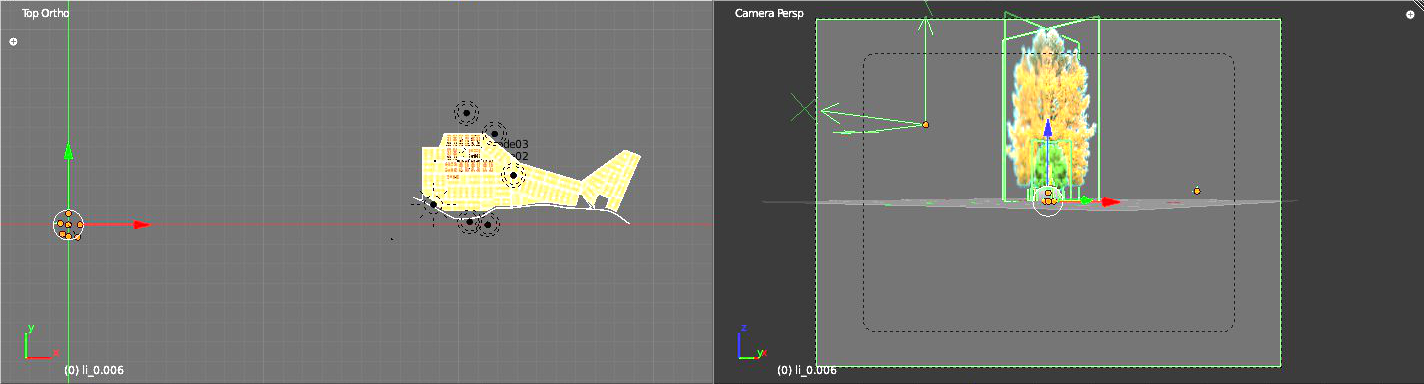
We run the same operation for the vertical coordinate of the mouse. Though you must be aware that the canvas height runs from the top (0) to the bottom (height), this is different from what we could expect (or from OpenGL coordinates, for example). In order to better understand the flipping operation (line 257), you can first comment/uncomment the code to see the difference.
Next find in the .blend file the pivot empty (ORB_PIVOT) and play with its rotation in the X axis. The rotation is demonstrated in Figure 7.11. Therefore, if we subtract our angle from 90º (__PI__/2 in radians), we get the proper angle to rotate the pivot vertically.
250 y = m.pi / 2 – y
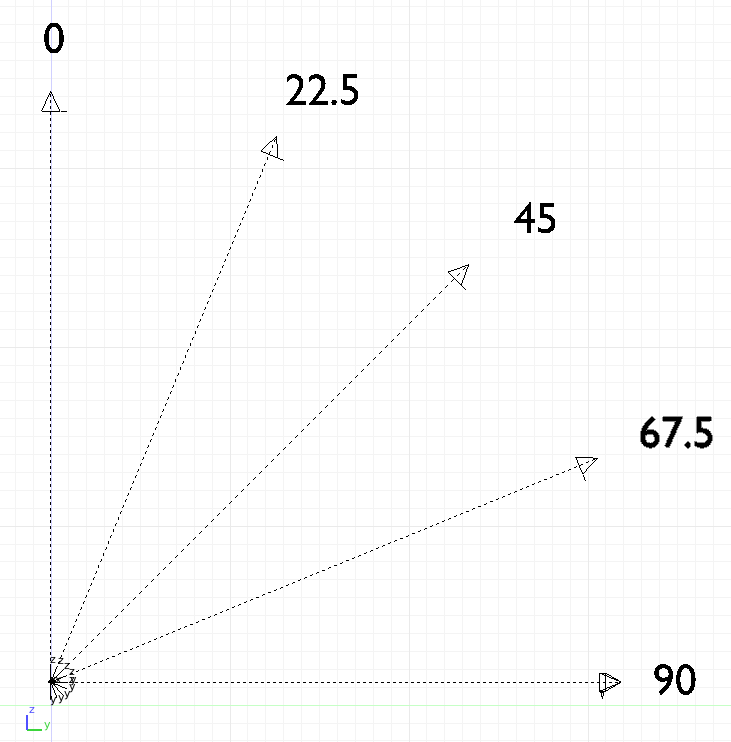
Orbit pivot rotation
scripts.look_camera
The function to rotate the walk/fly camera is quite different from the orbit one. We don’t have a direct relation between mouse coordinate and camera rotation anymore. Here we get the relative position of the cursor (from the center) and later force the mouse to be re-centered[md]to avoid continuous movement unless the mouse is moved again.
In order to get the relative position of the cursor, the normalizing function needs to be different. This time we want the center of the screen to be 0.0 and the extreme edges of the canvas (border of the game window) to be -0.5 and 0.5.
291     x = (win_x / screen_width)  - 0.5
292     y = (win_y / screen_height) - 0.5
The values of x and y can be used directly as radians angles to rotate the camera. However, when we are walking, we want to restrict the view vertically. This design decision means that we need to limit the view angle to a maximum and minimum range. Sure, this turns tying your shoes into a circus challenge. Though it may seem like overkill, this limitation helps add a better sense of reality to our navigation system.
The solution is to get the current camera vertical angle and see if by adding the new angle (i.e., vertical mouse move) we would end up over the limit of 45º. If so, we clamp the new angle to respect this value. To get the vertical angle, remember that the camera pivot (an empty object) is always parallel to the ground. Therefore, the vertical angle can be extracted from the camera’s local orientation matrix. If that still doesn’t make sense to you, try to find some 3D math tutorials online).
302     # limit top - bottom angles
303     if G.walk_fly == "walk":
304         angle = camera.localOrientation[2][1]
305         angle = m.asin(angle)
306
307     # if it's too high go down. if it's too low go high
308         if (angle + y) > top_limit: y = top_limit - angle
309         elif (angle + y) < bottom_limit: y = bottom_limit - angle
For the actual project this was originally designed for, we ended up moving the orbit camera code to be a subset of the walk/fly. Having the mouse always centered comes in handy when you have a user interface on top of that, and it needs to alternate between mouse clicking and camera rotating. Although the methods are different, the results are the same.
Game Interaction
camera_navigation.change_view
And the outcome of the functions:
camera_navigation.move_camera
camera_navigation.look_camera
camera_navigation.orbit_camera
In the previous section, we saw how the angles and directions were calculated with Python. However, we deliberately skipped the most important part: applying it to the game engine elements. It includes activating actuators (as we do in the change_view() function) or directly interfering in our game elements (cameras and pivots).
Outcome of the functions: scripts.move_camera, scripts.look_camera, and scripts.orbit_camera
Let’s put the pieces together now. We already know the camera future orientation and position. Therefore, there is almost nothing left to be calculated here. Nevertheless, there are distinct ways to change the object position and orientation.
In move_camera(), we are going to use an instance method of the pivot object called applyMovement (vector, local). This is part of the game engine methods (another one is applyRotation you will see next) we explain later in this chapter in the “Using the Game Engine API” section. This built-in function translates the object using the vector passed as a parameter. It can either be relative to the local or world coordinates:
336 def move_camera(direction):
(...)
356     # now that we calculated the vector we can move the pivot
357     pivot = G.cameras["MOVE"][2]
358     pivot.applyMovement(vector, True)
In a similar way in the look_camera() function, we will apply the rotation in the camera object. This has the advantage of sparing the hassles of 3D math, matrixes, and orientations. Also, instead of manually computing the new orientation matrix in Python, we can rely on the game engine C++ native (i.e., fast) implementation for that task.
269 def look_camera(sensor):
(...)
314     if G.walk_fly == "walk":
315         # Look Up rotation
316         camera.applyRotation([y,0,0], 1)
317
318         # Look Side rotation
319         pivot.applyRotation([0, -x, 0], 1)
Although we are leaving the math calculation to the game engine, we should still be aware of how it works. The applyRotation() routine works with Euler angles (as a gimbal machine). The effects for the walk and the fly modes are very similar. The only difference is whether the rotation is local or global and the axis to rotate around:
322     else: # G.walk_fly == "fly"
323         # Look Side rotation
324         pivot.applyRotation([0, 0, -x], 0)
325
326         # Look Up rotation
327         pivot.applyRotation([y, 0, 0], 1)
In the orbit_camera() function, we calculated the orientation matrix of the pivot. This matrix is no more than a fancy mathematical way of describing a rotation. Since we already have the matrix, all we need to do is to set it to our pivot orientation.
The orientation is a Python built-in variable that can be read and written directly by our script. We will talk more about this in the “Using the Game Engine API - Application Programming Interface” part of this chapter.
223 def orbit_camera(sensor):
(...)
261     # now we can use ori as our new orientation matrix
262     pivot = G.cameras["ORB"][2]
263     pivot.orientation = ori
scripts.change_view
After the user presses a key (1, 2, or 3) to change the view, we call the change_view() function to switch to the new camera (with a parameter specifying which camera to use). This function consists of two parts: first, we set the correct position and orientation for the camera and pivot; secondly, we change the current camera to the new one.
Note
Decomposing the View Orientation
Keep in mind that the desired orientation (stored in the empty and accessed through the G.views dictionary) represents the new view orientation. In our system, this view orientation is the combination of the parent object (pivot) orientation with the child one (camera).
Let’s start simple and build up as we go. First the orbit camera: in the orbit mode the camera is stationary[md]its position never changes. All we need to do is reset the pivot orientation to its initial values. Its orientation was globally stored back in the init_world() function. So now we can retrieve and apply it to the pivot:
155         dict = G.cameras["ORB"]
157         pivot = dict[2]
158         pivot.orientation = dict[1]["orientation"]
The fly camera is slightly different. In this case, the camera orientation contains no rotation (i.e., an identity matrix). Therefore, it’s up to the pivot orientation to match the view orientation. In other words, the pivot orientation matrix is exactly the same as the view orientation matrix:
169         pivot.position = G.views[view].position
170         pivot.orientation = G.views[view].orientation
171         camera.orientation = [[1,0,0],[0,1,0],[0,0,1]]

177         if G.walk_fly == "walk":
178             fly_to_walk()
For the walk camera, we have yet another situation. The mode we are coming from (fly) has the camera pivot orientation (same as camera.worldOrientation) as the current view orientation. However, for the walk mode, the pivot needs to be parallel to the ground.
For that, we need to rotate it a few degrees to align with the horizon. The camera now will be looking to a different point (above/below the original direction). In order to realign the camera with the view orientation, we need to rotate the camera in the opposite direction. This way, the pivot and camera rotations void each other (with the benefit of having the pivot now properly aligned with the ground).
190 def fly_to_walk():
(...)
194     view_orientation = camera.worldOrientation
195     euler = view_orientation.to_euler()
196     angle = euler[0] - (m.pi/2)
197
198     pivot.applyRotation([-angle,0,0],1)
199     camera.applyRotation([angle,0,0],1)
Note
Reasoning Behind the Design
There is another reason for keeping this as a separate function. Originally, I was planning to switch modes (walk/fly) while keeping the same camera position and view. Although I dropped the idea, I decided to keep the system flexible in case of any turn of events (clients who understands their minds?).
Now that the new camera and pivot have the correct position and orientation, we can effectively switch cameras. For that, we first set the new camera in the Scene Set Camera actuator. Next, we activate the actuator and the camera will change:
181     act_camera.camera = dict[0]
182     cont.activate(act_camera)
More Python
scripts.collision_check
scripts.stick_to_ground
The script system shown so far handles all the interaction from the game engine sensors to the 3D world elements. Even though this covers most parts of a typical script architecture, I’d be lying if I said this is all you will be doing in your projects. Very often, you will need a script called once in a while that deals directly with the game engine data. In our case, we will have two “PySensors” to control the collision and to stick our camera to the ground while walking.
We could have them both working attached to an Always sensor. However, this would not be too efficient. Since we only need them while walking and flying, they can be integrated with the Keyboard sensor pipeline. The stick_to_ground() function will be called after any key is pressed if the current mode is “walk”:
142         if G.nav_mode == "walk" and G.walk_fly == "walk":
143             stick_to_ground()
The collision system can be used even more specifically. Inside the move_camera() function, we will use the collision test to validate or discard our moving vector:
353         # if there is any obstacle reset the vector
354         vector = collision_check(vector, direction)
If the collision_check() test finds any obstacle in front of the camera, it returns a null vector ([0, 0, 0]). Otherwise, it leaves the vector as it was set, which will then move the camera.
The code of those functions is very particular to this project; therefore, we’re not going into more detail here. (You are encouraged to take a look at the complete code in the book file, though). Nevertheless, the key point is to understand the role of those functions in the script architecture. Those scripts can complement the functionality of other functions, to rule your game in a global and direct way, or simply to tie things together.
Reusing Your Script
One of the reasons this system was designed so carefully is because of the need for portability. You don’t want to rewrite a navigation system every time you have a new project. This is not particular to this script example. Very often, you will be recycling your own scripts to adapt them to new files. Let’s go over some principles you should know.
File Organization - Groups and Layers
The first thing to have in mind is how your final file will look. Do you want the script system to be merged with the rest of the existent Blender file? Do you want to keep them in separated scenes (very common for user interfaces)? Will you need to access/edit the script system elements later?
In our case, there is no need for an extra scene. However, we need to make sure that the navigation system elements are easy to access (especially the empties with the cameras’ positions). If you can afford to dedicate one layer exclusively to the navigation system elements, do it. Make sure that the desired layer is empty in the model file and that all the objects you want to import are contained in this layer.
If it’s not possible to have all your elements in a single layer, you can create a group for them. That way, you can always quickly isolate them to be listed in the outliner and selected individually. The other advantage of using groups is during importing. It’s easier to select a group to be imported than to go over all the individual objects, determining which one should be imported and which one is part of the test environment (which usually doesn’t have to be imported).
Tweaks and Adjustments - Getting Your Hands Dirty
Open the file /Book/Chapter7/4_navigation_system/walkthrough_1_base/walkthrough.blend
This small file is part of the presentation of an architectural walkthrough of an urban project (see Figure 7.12) that I (Dalai) did. It’s an academic project and only my second project using the game engine. As you can see, there are absolutely no scripts in it[md]all the interaction is done with logic bricks. I didn’t use Python for this project mainly because I had absolutely no knowledge of Python at all back then (and the project was done in six days).
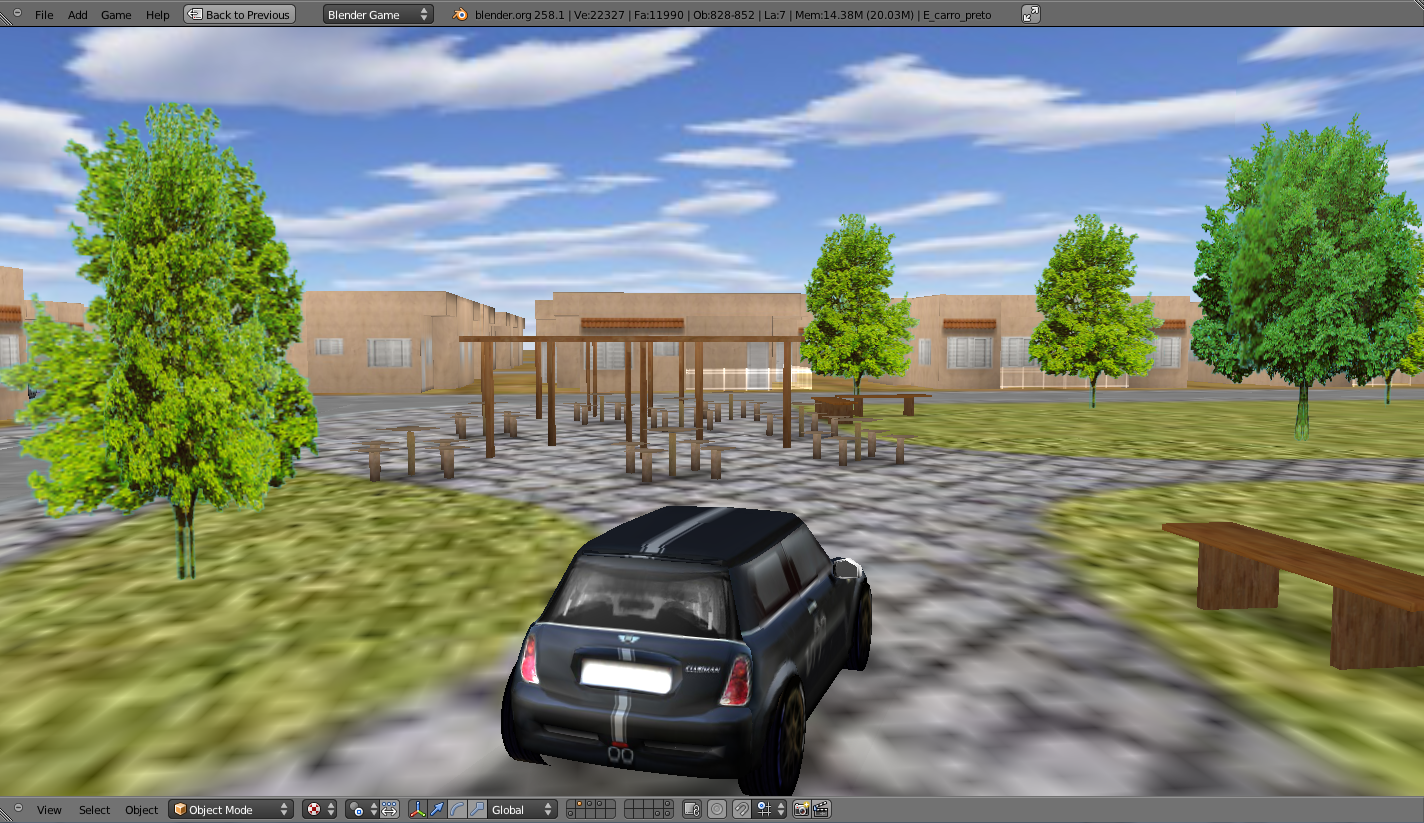
Architectural walkthrough example file
It’s time for redemption. Let’s replace its navigation system with the Python system we just studied. For convenience, this file was already organized to receive the navigation elements (cameras, empties, and so on.).
Organize and Append Your File
In this case, we decided to group all the navigation elements in a group called NAVIGATIONSYSTEM and to make sure they are all in layer 1. You can use the Outliner to make sure you didn’t miss any object out of the group. Leave the lamps and the collision objects out of the group.
To see a snapshot of the file at this moment, you can find it in the book files at: /Book/Chapter7/4_navigation_system/walkthrough_2_partial/camera_navigation.blend
Now open the walkthrough file again and append the NAVIGATIONSYSTEMwe created. It’s important not to link the group but to append it. Linked elements can only be moved in their original files; thus, you should avoid them in this case.
Open the Append Objects Dialog (Shift+F1).
Find the NAVIGATIONSYSTEM group inside the camera_navigation file.
Make sure the option “Instance Groups” is not checked. (This would insert the group, not the individual elements.)
Click on the “Link/Append from Library”. (This will add the group.)
Set CAM_Orbit as the default camera. (Tip: Use the Outliner to find the object; it’s inside the ORB_PIVOT.)
A snapshot with those changes can be found at:
/Book/Chapter7/4_navigation_system/walkthrough_2_partial/walkthrough.blend
Now if you run the application, the navigation system should work - kind of (see Figure 7.13).
Still not there
Adjustments in Loco
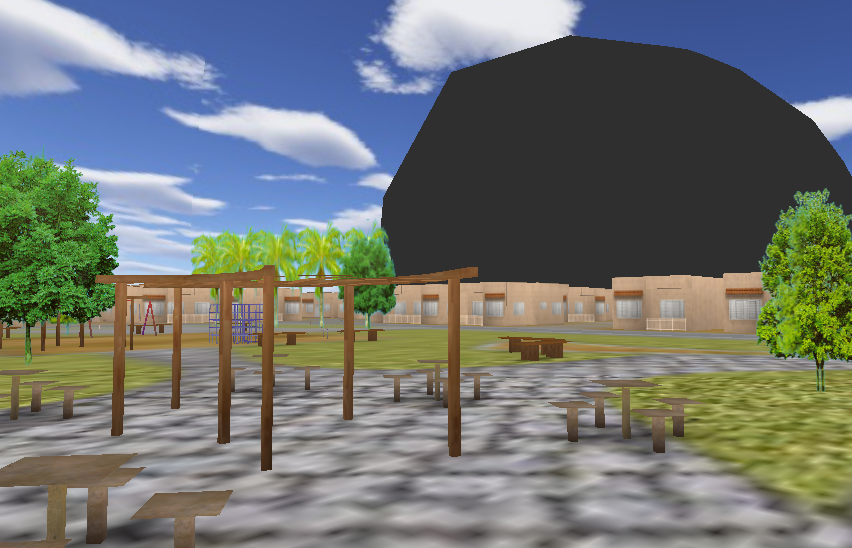
As you can see in Figure 7.13, the new camera system looks absurdly wrong. There are two main reasons for that: the walkthrough file elements are far away from the file origin [0, 0, 0], and the cameras are not prepared for a project with this magnitude (their clipping parameters are way too low). We will need to move the objects to their new correct places, adjust the camera parameters, and do a small intervention in the script file:
All the elements from NAVIGATIONSYSTEM group (layer 1):
Move them 2000 in X and 350 in Y.
Empties :
CAM_front and CAM_back - Those empties will hold the position for walk cameras. Make sure their position from the ground is at the human eyes (~1.68).
CAM_top and CAM_side - Those empties will be used in Fly Mode. Here, we should also make sure their initial orientation looks good. The easiest way to do that is by using the Fly Mode (select the object, set it as current camera, and use Shift+F).
The one thing missing for the camera is to increase the clipping distance. That way, we can see all the skydome around the camera (see before and after in Figure 7.14).
Cameras :
CAM_Orbit - Adjust initial Z, change clip ending to 1000.
CAM_Move - change clip ending to 1000.
A snapshot with those changes can be found at:
/Book/Chapter7/4_navigation_system/walkthrough_3_partial/walkthrough.blend
Camera clipping of 400 |
Camera clipping of 1000 |
|---|---|
|

|
Note
Make Sure That Collision Is Set Properly
All the houses, the ground, and the other 3D objects already have collision enabled in this file. In other situations, however, you may need to change the collision objects, enabling or disabling their collisions accordingly. The Python raycast uses the internal Bullet Physics engine under the hood. In order to prevent the camera from going through the walls and the ground, set enough collision surfaces (but not too much, so that you don’t compromise the performance of your game).
Script Tweaks
Finally, it’s good to fiddle a bit with the script. Due to the particularities of this project (mainly its scale), you may feel that everything happens a bit too fast. It’s up to you to change the settings in the init_world function. Also, it would be interesting to explore multiple viewpoints for this presentation. We have already positioned the side and back empties. Although we were not using them previously, their names are present in the script as part of the available cameras list:
93 available_cameras = ["front", "back", "side", "top"]
The difference now is that we will make the camera actually change to the side and back views when you press the keys four and five respectively. As you can see here, it’s really easy to expand a system like this. Try to create a fifth camera (add a new empty) and see how it goes. To enable the “side” and “back” cameras, the only code we have to add is:
110 def keyboard(cont):
(...)
new             elif value == GK.FOURKEY:
new                 change_view("side")
new             elif value == GK.FIVEKEY:
new                 change_view("back", "fly")
There is not much more to be done here. This is a simple script, but its structure and the workflow we presented are not much different from what you will find in more complex systems you may have to implement or work with. There are different ways to implement a navigation system. This one was designed focusing on a didactic structure (clean code as opposed to a highly optimized system that is hard to read) and robustness (easy to expand). Try to find other examples or, better yet, build one yourself.
The final file is on the book files as:
/Book/Chapter7/4_navigation_system/walkthrough_4_final/walkthrough.blend.
Using the Game Engine API - Application Programming Interface
The game engine API is a bridge connecting your Python scripts with your game data. Through those modules, methods, and variables you can interact with your existent logic bricks, game objects, and general game functions.
The official documentation can be found online in the Blender Foundation website (TODO to be changed):
http://www.blender.org/documentation/blender_python_api_2_66_release
We will now walk through the highlights of the modules. After you are familiar with their main functionality, you should feel comfortable to navigate the documentation and find other resources.
Game Engine Internal Modules
Game Logic (bge.logic)
Game Types (bge.types)
Rasterizer (bge.render)
Game Keys (bge.events)
Video Texture (bge.texture)
Physics Constraints (bge.constraints)
Application Data (bge.app) //TODO
Stand-Alone Modules
Audio System (aud)
Math Types and Utilities (mathutils)
OpenGL Wrapper (bgl)
Font Drawing (blf)
bge.logic
The main module is a mix of utility functions, global game settings, and logic bricks replacements. Some of those functions were already covered in the tutorial, but they are here again for convenience sake. We will look at some of the highlights.
getCurrentController()
Returns the current controller. This is used to get a list of sensors and actuators (to check status and deactivate respectively), and the object the controller belongs to:
controller  = bge.logic.getCurrentController()
object = controller.owner
sensor = controller.sensors['mysensor']
If you are using Python modules instead of Python scripts directly (see Python Controller), the controller is passed as an argument for the function:
def moduleFunction(cont):
   object = cont.owner
   sensor = cont.sensors['mysensor']
getCurrentScene()
This function returns the current scene the script was called from. The most common usage is to give you a list of all the game objects:
for object in bge.logic.getCurrentScene().objects: print(object)
expandPath()
If you need to access an external file (image, video, Blender, etc.), you need to first get its absolute path in the computer. Use single backslash (/) to separate folders and double backslash (//) if you need to refer to the current folder:
video_absolute_path = bge.logic.expandPath('//videos/video01.ogg')
sendMessage(), addScene(), start/restart/endGame()
These functions copy the functionality of existent actuators. They are Python replacement for those global events when you need a direct way to call them, bypassing the logic bricks.
LibLoad(), LibNew(), LibFree(), LibList() (TODO to be replaced with new ones)
There are cases when you need to load the content of an external Blender file at runtime. This is known as _dynamic loading._ The game engine supports dynamic loading of actions, meshes, or complete scenes. The new data blocks are merged into the current scene and behave just like internal objects:
bge.logic.LibLoad("//entities.blend", "Scene")
Note
Beware of Lamps
New Lamp objects can be dynamically loaded from external files. However, in GLSL mode, they will not work as a light source for the material shaders, since the shaders would need to be recompiled for that.
globalDict, loadGlobalDict(), saveGlobalDict()
The bge.logic.globalDict is a Python dictionary that is alive during the whole game. It’s a game place to store data if you need to restart the game or load a new file (level) and need to save some properties. In fact, you can even save the globalDict with the Blender file during the game and reload later.
bge.logic.globalDict["password"] = "kidding, kids never save your passwords in files!"
bge.logic.saveGlobalDict() # save globalDict externally
bge.logic.loadGlobalDict() # replace the current globalDict with the saved one
keyboard
You can handle all the keyboard inputs directly from a script. The usage and syntax are very similar to the Keyboard sensor. You need a script running every logic tic (Always sensor pulsing with a frequency of 0 or every time a key is pressed; Keyboard sensor with “All Keys” set) where you can read the status of all the keys in the bge.logic.keyboard. events dictionary. If instead of inquiry for the status of a particular key (e.g., if spacebar is pressed), you want to list all the pressed keys, you can use the dictionary bge.logic.keyboard.active_events.
The keys for both event dictionaries are the same you use with the Keyboard sensor (see the bge.events module). The status of each key (whether it was pressed, released, kept pressed, or nothing) is the value stored in the dictionary. The keys values are defined in the bge.logic module itself:
keyboard = bge.logic.keyboard
space_status = keyboard.events [bge.events.SPACEKEY]
if space_status == bge.logic.KX_INPUT_JUST_ACTIVATED:
   print("space key was just pressed.")
elif space_status == bge.logic.KX_INPUT_ACTIVE:
   print("space key is still pressed.")
elif space_status == bge.logic.KX_INPUT_JUST_RELEASED:
   print("space key was just released.")
else: # bge.logic.KX_INPUT_NONE
   pass
A sample file can be seen at BookChapter75_game_keyskey_detector_python.blend . This shows the more Python-centric way of handling keyboard. For the classic method of using a Keyboard sensor, look further in this chapter into the “bge.events” section.
mouse
Similar to the keyboard, this Python object can work as a replacement for the Mouse sensor. There are a few differences that make it even more appealing for scripting[md]in particular, the fact that the mouse coordinates are already normalized. As we explained in the tutorial, this helps you get consistent results, regardless of the desktop resolution. The available attributes are:
events - a dictionary with all the events of the mouse (left-click, wheel up, and so on) and their status (for example, bge.logic.KX_INPUT_JUST_ACTIVED).
position - normalized position of the mouse cursor in the screen (from [0,0] to [1,1]).
visible - show/hide the mouse cursor (can also be set in the Render panel for the initial state).
joysticks
This is a list of all the joysticks your computer supports. That means the list is mainly populated by None objects, and a few, if any, joystick Python objects. To print the index, name, number of axis, and active buttons of the connected joysticks, you can do:
for i in bge.logic.joysticks:
   joystick = bge.logic.joysticks[i]
   if joystick and joystick.connected:
      print(i, joystick.name, joystick.numAxis, joystick.activeButtons)
Others
There are even more functions available in this module (setMist, getLogicTicRate, and setGravity, for example). Make sure that you visit the online documentation (or the documentation included on the book files) to see them all.
bge.types
Objects, meshes, logic bricks, and even shaders are all different game types. Every time you call an internal function from one of them, you are accessing one of those functions. This happens when you get a position of an object, change an actuator value, and so on.
Each one of the classes has the same anatomy. You can access instance methods and instance variables. In order to explain their use properly, we will go over one of the most commonly used modules, the game object.
Some of the variables will only work inside the correct context. Therefore, you can’t get the mouse position of a Mouse sensor if the sensor was not triggered yet. Be aware of the right context and the game type.
Class KX_GameObject
If you run a print(dir (object)) inside your script, you will get a very confusing list. It includes Python internal methods, instance methods, and instance variables. Most of them are common to all objects, so we are going to talk about them first. However, lamps and cameras not only inherit all the game object methods but also extend them with specific ones.
Note
The Truth Is Out There
In order to see all available methods, please refer to the documentation. We are only covering a few of them here.
Python Internal Methods
__class__, __doc__, __delattr__ …
Most of those methods are inherited from the Python object we are dealing with. However, given the nature of the Python classes presented in Blender, some of those methods may not be fully accessible. It’s unlikely you will be using them. So for now it’s safe to ignore any method starting and ending with double underlines (__ignoreme__).
Instance Methods
endObject(), rayCast(), getAxisVect(), suspendDynamics(), getPropertyNames() …
If it looks like a function, it should be one. Every game engine object provides you with a set of functions to interact with them or from them to the others. Here are some methods you should know about:
rayCast (objto, objfrom, dist, prop, face, xray, poly)
“Look from a point/object to another point/object and find first object hit within dist that matches prop.”
This method is a more complete version of the rayCastTo(). It has so many applications that it becomes hard to delimitate its usage. For instance, this was the method used to calculate the collision in the navigation system script we studied previously.
getPropertyNames()
“Get a list of all property names.”
Once you retrieve the list of property names, you can use it to see if the object has a specific property before using it. To get individual properties, you can use if “prop” in object: or object.get(“prop”, default=None).
Note
A Use for Properties
Properties have multiple uses in the game engine. One of those uses is to mark an object to be identified by the Python script. Why not use their names instead? While names work fine to retrieve individual objects, properties allow you to easily mark and access multiple objects at once. Frankly, it’s easier to create an organized, named, and tagged MP3 collection than it is to find time to properly name all your Blender data blocks[ms]objects, meshes, materials, textures, images, and so on.
endObject()
“Delete this object can be used in place of the EndObject Actuator.”
This method is one of the functions that mimic existent actuators. You will also find this design in methods such as sendMessage(), setParent(), and replaceMesh().
applyRotation()
“Set the game object’s movement/rotation.”
There are a few methods that will free you from doing 3D math manually. This particular one is a replacement for multiplying the object orientation matrix by a rotation matrix. (If you are “old school,” you can still set the orientation matrix directly though.)
Other methods are applyMovement(), applyForce(), applyTorque(), getDistanceTo(), getVectTo(), getAxisVect(), and alignAxisToVect().
Instance Variables
_name, position, mass, sensors, actuators …_
Last but definitively not least, we have the built-in variables. They work as internal parameters of the object (for example, name, position, orientation) or class objects linked to it (for example, parent, sensors, actuators). In Blender versions prior to 2.49, those variables were only accessible through a conjunct of get and set statements (setPosition(), getOrientation(), and so on). In Blender 2.5, 2.6 and on, they not only can be accessed directly, but also manipulated as any other variable, list, dictionary, vector, or matrix you may have:
obj.mass = 5.0
obj.worldScale *= 2
obj.localPosition [2] += 3.0
obj.worldOrientation.transpose()
print(obj.worldTransform)
position, localPosition, worldPosition
Position is a vector [x, y, z] with the location of the object in the scene. We can get the absolute position (worldPosition) or the position relative to the parent of the object (localPosition). And what about accessing the position variable directly? This is deprecated, but you may run into it in old files you find online. If you access the position variable directly, you get the world position on reading and set the local position on writing. Confusing? That is why this is deprecated ;)
orientation, localOrientation, worldOrientation
This variable gives you access to a matrix 3x3 with the orientation of the object. The orientation matrix is the result of the rotation transformation of an object and the influence of its parent object. As with position, the orientation variable will give you the world orientation on reading and set the local orientation on writing. As with position, you should always specify whether you want the local or world orientation.
visible
We have different ways to set the visibility of an object. If your material is not set to invisible in the game panel, you can use this method. To change the visibility recursively (to the children of the object), you must use the method setVisibility.
sensors, controllers, actuators
All the logic bricks of an object can be accessed through those dictionaries. The name of the sensor/controller/actuator will be used as the dictionary key, for it’s important to name them correctly.
Sub-Class KX_Camera
Not all the objects have access to the same methods and variables. For example, an empty object doesn’t have mass, and a static object doesn’t have torque.
When the object is a camera, the difference is even more distinct. The camera object has its own class derived from KX_GameObject. It inherits all the instance variables and methods and expands it with its own. You will find some screen space functions (getScreenPosition(),getScreenVect(), getScreenRay()), some frustum methods (sphereInsideFrustum(), boxInsideFrustum(), pointInsideFrustum()), and some instance variables (lens, near, far, frustum_culling, world_to_camera, camera_to_world).
Sub-Class KX_Lamp
Like cameras, lamps also have their own subclass. It inherits all the instance variables and methods, and only expands the available variables.
The parameters that can be changed with Python include all that can be animated with the Action actuator: energy, color, distance, attenuation, spot size, and spot blend. Additionally, you can change the lamp layer in runtime.
bge.render
If we compare gaming with traditional 3D artwork, rasterizer would be the rendering phase of the process. Internally, it’s when all the geometry is finally drawn to the screen with the light calculation, the filters applied, and the canvas set. For this reason, the Rasterizer module presents functions related to stereoscopy, windows and mouse management, world settings, and global GLSL material settings.
Window and Mouse
getWindowWidth() / getWindowHeight()
Get the width/height of the window (in pixels).
showMouse(visible)
Enable or disable the operating system mouse cursor.
setMousePosition(x, y)
Set the mouse cursor position (in pixels).
World Settings (TODO to be removed/changed)
setBackgroundColor(rgba), setAmbientColor(rgb)
Set the ambient and background color.
setMistColor(rgb), disableMist(), setMistStart(start), setMistEnd(end)
Configure the mist (fog) settings.
Stereo Settings (TODO to be changed)
getEyeSeparation() / setEyeSeparation(eyesep)
Get the current eye separation for stereo mode. Usually focal length/30 provides a comfortable value.
getFocalLength() / setFocalLength(focallength)
Get the current focal length for stereo mode. It uses the current camera focal length as initial value
Material Settings (TODO to be changed)
getMaterialMode(mode) / setMaterialMode(mode)
Get/set the material mode to use for OpenGL rendering. The available modes are:
KX_TEXFACE_MATERIAL, KX_BLENDER_MULTITEX_MATERIAL, KX_BLENDER_GLSL_MATERIAL
getGLSLMaterialSetting(setting) / setGLSLMaterialSetting(setting, enable)
Get/set the state of a GLSL material setting. The available settings are:
“lights”, “shaders”, “shadows”, “ramps”, “nodes”, “extra_textures”
Others
drawLine(fromVec, toVec, color)
Draw a line in the 3D scene.
enableMotionBlur(factor) / disableMotionBlur()
Enable/disable the motion blue effect.
makeScreenshot(filename)
Write a screenshot to the given filename.
bge.events
The Keyboard sensor allows you to set individual keys. As you can see in Figure 7.15, it can also be triggered by any key once you enable the option “All Keys.” This is very useful to configure text input in your game or to centralize all keyboard events with a single sensor and script.

In this case, every key pressed into a Keyboard sensor, will be registered as a unique integer. Each number corresponds to a specific key, and finding them allows you to control your actions accordingly to the desired key map. In order to clarify this a bit more, try the file in /Book/Chapter7/5_game_keyskey_detector_logicbrick.blend.
This file is similar to the key_detector_python.blend we used to demonstrate bge.logic.keyboard. However, this file is using the Keyboard sensor directly, instead of its wrapper.
from bge import logic
from bge import events
cont = logic.getCurrentController()
owner = cont.owner
sensor = cont.sensors["s_keyboard"]

if sensor.positive:
   # get the first pressed key
   pressed_key = sensor.events[0][0]
   text = "the key number is: %d\n" % pressed_key
   text += "the key value is: %s\n" % events.EventToString(pressed_key)
   text += "the character is: %s" % events.EventToCharacter(pressed_key, 0)

   # press space to reset the initial text
   if pressed_key == events.SPACEKEY:
      text = "Please, press any key."
   owner["Text"] = text
This script is called every time someone presses a key. The key (or keys) are registers as a list of events, each one being a list with the pressed key and its status. In this case, we are reading only the first pressed key:
pressed_key = sensor.events[0][0]
This line stores the integer that identifies the pressed key. However, we usually would need to know the actual pressed key, not its internal integer value. Therefore, we are using the only two functions available in this module to convert our key to an understandable value:
text += "the key value is: %s\n" % events.EventToString(pressed_key)
text += "the character is: %s" % events.EventToCharacter(pressed_key, 0)
After that, we are checking for a specific key (spacebar). bge.events.SPACEKEY is actually an integer (to find the other keys’ names, visit the API page):
if pressed_key == events.SPACEKEY: text = "Please, press any key."
And, voilà, now we only need to visualize the pressed key:
owner["Text"] = text
Note
Key Status
The status of a key is what informs you whether the key has just been pressed or if it was pressed already. The Keyboard sensor is always positive as long as any key is held, and you may need to trigger different functions when some keys are pressed and released. The status values are actually stored in bge.logic:
0 = bge.logic.KX_INPUT_NONE
1 = bge.logic.KX_INPUT_JUST_ACTIVATED
2 = bge.logic.KX_INPUT_ACTIVE
3 = bge.logic.KX_INPUT_JUST_RELEASED
bge.texture
The texture module was first discussed in the Chapter 5, “Graphics.” With the texture module, you can change any texture from your game while the game is running. The texture can be replaced by a single image, a video, a game camera, and even a webcam stream.
Let’s look at a basic example. Please open the file: BookChapter76_texturebasic_texture_replacement.blend.
This file has a single plane with a texture we will replace with an external image. Press the spacebar to change the image and Enter to return to the original one. The script responsible for the texture switching is:
from bge import logic
from bge import texture
def createTexture(cont):
   """Create a new dynamic texture"""
   object = cont.owner

   # get the reference pointer (ID) of the texture
   ID = texture.materialID(obj, 'IMoriginal.png')

   # create a texture object
   dynamic_texture = texture.Texture(object, ID)

   # create a new source
   url = logic.expandPath("//media/newtexture.jpg")
   new_source = texture.ImageFFmpeg(url)

   # the texture has to be stored in a permanent Python object
   logic.dynamic_texture = dynamic_texture

   # update/replace the texture
   dynamic_texture.source = new_source
   dynamic_texture.refresh(False)

def removeTexture(cont):
   """Delete the dynamic texture, reversing it back to the original one."""
   try: del logic.dynamic_texture
   except: pass
It’s a simple script, but let’s look at the individual steps. We start by getting the material ID (that can be retrieved for an image used by an object, hence the prefix IM) or a material that uses a texture (with the prefix MA).
ID = texture.materialID(object, 'IMoriginal.png')
With this ID, we can create a Texture object that controls the texture to be used by this object (and the other objects sharing the same image/material).
dynamic_texture = texture.Texture(object, ID)
The next step is to create the source to replace the texture with. The bge.texture module supports the following sources: ImageFFmpeg (images), VideoFFmpeg (videos), ImageBuff (data buffer), ImageMirror (mirror), ImageRender (game camera), ImageViewport (current viewport), and ImageMix (a mix of sources).
new_source = texture.ImageFFmpeg(url)
Now we only need to assign the new source to be used by the object texture and to refresh the latter. The refresh function has a Boolean argument for advanced settings. A rule of thumb is: for videos, use refresh (True); for everything else, try refresh (False) first.
dynamic_texture.source = new_source
dynamic_texture.refresh(False)
For the image to be permanent, we have to make sure the new dynamic_texture is not destructed after we leave our Python function. Therefore, we store it in the global module bge.logic. If you need to reset the texture to its original source, simply delete the stored object (for example, del logic.dynamic_texture).
Since this is a simple image, you don’t need to do anything after that. If you are using a video as source, you need to keep refreshing the texture every frame. Videos also support an audio-video syncing system. To make them play harmoniously together, you first play the audio and then query its current position to pass as a parameter when updating the video frame (for example, _logic.video.refresh(True, logic.sound.time)_). The audio can come from an Audaspace object or even a Sound actuator.
In the book files, you can find other examples using different sorts of source objects:
Basic replacement of texture:
/Book/Chapter7/6_texture/basic_texture_replacement.blend
Basic video playback with Sound actuator:
/Book/Chapter7/6_texture/basic_video_sound.blend
Video player with interface controllers:
/Book/Chapter7/6_texture/player_video_audio.blend
Basic video playback with Audaspace:
/Book/Chapter7/6_texture/video_audaspace.blend
Mirror effect:
/Book/Chapter7/6_texture/mirror.blend
Render to texture:
/Book/Chapter7/6_texture/render_to_texture.blend
Webcam sample:
/Book/Chapter7/6_texture/webcam.blend
bge.constraints
The Bullet Physics engine allows for advanced control over the physics simulation in your game. Using Bullet as a backend, this module (formerly known as Physics Constraints) allows you to create and set up rigid joints, dynamic constraints, and even a vehicle wrapper. The constraints’ functionalities make sense only when you understand the context in which they are to be used (with physic dynamic objects). Therefore, this module is covered in the previous chapter on game physics.
Mathutils - Math Types and Utilities
Mathutils is a generic module common to both Blender and the game engine. There are a lot of methods to facilitate your script in handling 3D math operations. You won’t have to reinvent the wheel every time you need to multiply vectors or transpose matrixes. Simply using the mathutils classes and built-in methods frees you to invest your time in something far more important: relearning all of the long-forgotten math lessons you skipped.
Unless your background is in math, physics, or engineering, you won’t use this module any time soon. For those already familiar with the passionate secrets of math, you’ll be glad to know that those module’s functions are mainly self-explanatory. Names such as cross, dot, slerp (what?), and a quick look at their specifications will be all you need to know to start working with them. Nevertheless, newcomers often use this module without even knowing it. Every time you change an object position, get the vector from an object, or apply a rotation, you are using mathutils classes and methods. Therefore, it’s good to have this module as a reference for further studies and more advanced coding. (We all get there eventually.)
We are going to present the four available classes in this module: vector, matrix, Euler, and quaternion. For a list of the available methods, refer to the API documentation.
Vector
This class was already present in the KX_GameObject class and in the script example. It behaves like a list object, with some advanced features (for example, swizzle and slicing) expanded with its instance methods. Some of those methods are: reflect, dot, cross, and normalize.
A recurring problem that new Python programmers have is with list copying. If you forget to manually copy the list when assigning it to a new variable, you end up with two variables sharing the same list values forever (each of the variables becomes a pointer to the same data).
The same behavior happens with Vectors. Look at the differences:
new_vector = old_vector
if you change new_vector you will automatically change old_vector (and vice-versa).
new_vector = old_vector[:]
new_vector is a new independent list object initialized with the old_vector values.
new_vector = vector.copy()
new_vector is a new Vector, an independent copy of the old_vector object.
Matrix
While vectors behave similarly to lists, matrices behave similarly to multidimensional lists. A multidimensional list is a list of a list, organized either in columns or rows.
While in Python, a list of a list is always the same:
matrix_row = [[1,2,3], [4,5,6], [7,8,9]]
In a mathutils.Matrix, the data can be stored differently, accordingly to the matrix orientation (row/column). Following you can see how the order of the elements in a matrix changes, according to its orientation (note, this is not actual Python code):
matrix_row_major    =  [[1 2 3]
                       [4 5 6]
                       [7 8 9] ]

                      [1][4][7]
matrix_column_major = [|2||5||8|]
                      [3][6][9]
It’s important to be aware of the ordering of your matrices; otherwise, you end up using a transposed matrix for your calculations. Since all the game engine internal matrices (orientation, camera to world, and so on) are column-major oriented, you will be safer sticking to this standard.
If your matrix represents a transformation matrix (rotation, translation, and scale) you can get its values separately. Matrix.to_quaternion() and Matrix.to_euler() will give you the rotation part of the matrix in the form you prefer (see next section), and Matrix.to_translation() and Matrix.to_scale () will give you the translation and the scale vector, respectively.
Euler and Quaternion
Euler and quaternion are different rotation systems. The same rotation can be represented using Euler, quaternion, or an orientation matrix.
Note
Guerrilla CG
You can find two great video tutorials on the Guerrilla CG vimeo channel that explain and compare the two rotation system:
Euler Rotations Explained: http://vimeo.com/2824431
The Rotation Problem: http://vimeo.com/2649637
When you convert an orientation matrix to Euler (Matrix.to_euler()), you get a list with three angles. They represent the rotation in the x, y, z axis of the object. In the navigation system script example, we are using this exact method to determine the horizontal camera angle. You can find this usage in the function fly_to_walk() (lines 190 to 199 of navigation_system.py or in the early pages of this chapter).
Conversion Between Different Rotation Forms
You can convert an orientation matrix to Euler, an Euler to a quaternion, a quaternion to an orientation matrix, and on and on and on:
original_matrix=mathutils.Matrix.Rotation(math.pi, 3, "X")

converted_matrix=original_matrix.to_euler().to_quaternion().to_matrix().to_euler().to_matrix().to_quaternion().to_euler().to_matrix().to_quaternion().to_euler().to_quaternion().to_matrix()
In this example, converted_matrix ends up as the same matrix as original_matrix.
aud - Audio System
This module allows you to play sounds directly from your scripts. There are three classes you will be working with: Device, Factory, and Handle.
The audaspace module in a nutshell: you need to create one audio Device per game. You need one Factory per audio file (which can also be any video file containing a sound track). And every time you need to play a sound, a new Handle object will be generated from the Factory (this is where its name comes from).
Example: Basic Audio Playback (TODO to be adapted to new API)
import aud
device = aud.Device()
## load sound file (it can be a video file with audio)
sound = aud.Sound('music.ogg')
## play the audio, this return a handle to control play/pause
handle = device.play(sound)
## if the audio is not too big and will be used often you can buffer it
sound_buffered = aud.Sound.buffer(sound)
handle_buffered = device.play(sound_buffered)
## stop the sounds (otherwise they play until their ends)
handle.stop()
handle_buffered.stop()
We start by creating an audio device. This is simply a Python object you will use to play your sounds. Next, we create a Factory object. A factory is a container for a sound file. When we pass the Factory object into the device play function, it will start playing the sound and return a handle. Handles are used to control pause/resume and to stop an audio.
Note
When Will This Music Stop?
After you initialize a sound, you can get its current position in seconds with the handle.position Python property. This is especially useful to keep videos and audio in sync. If you need to check whether or not the audio is ended, you shouldn’t rely on the position, though. Instead, you can get the status of the sound by the property handle.status. If you are using the sound position to control a video playback, the sound status will also tell you if the video is over (handle.status = aud.AUD_STATUS_INVALID). The possible statuses are:
0 = aud.AUD_STATUS_INVALID
1 = aud.AUD_STATUS_PLAYING
2 = aud.AUD_STATUS_PAUSED
bgl - OpenGL Wrapper
This module is a wrapping of OpenGL constants and functions. It allows you to access low-level graphic resources within the game engine. You can use this module to draw directly to the screen or to read OpenGL matrices and buffers directly.
Sometimes, you will need to run your OpenGL code specifically before or after the game engine drawing routine, so you can store your Python function as a list element either in the scene attributes pre_draw and/or in the post_draw. This will be demonstrated in our first example.
Note
To Learn OpenGL
You can find good OpenGL learning material on the Internet or in a bookstore. The Official Guide to Learning OpenGL (also known as The Red Book) is highly recommended, and some older versions of it can be found online for download.
Example 01: Line Width Changing
Open the file /Book/Chapter7/7_bgl/line_width.blend.
(run it in wireframe mode)
from bge import logic
import bgl
def line_width():
   bgl.glLineWidth(100.0)

scene = logic.getCurrentScene()
if line_width not in scene.pre_draw:
   scene.pre_draw.append(line_width)
This code needs to run only once per frame and will change the line width of the objects. Be aware that the line is only drawn in the wireframe mode.
You will find on the book files another example where the line width changes dynamically - /Book/Chapter7/7_bgl/line_width_animate.blend.
Example 02: Color Picker
Open the file /Book/Chapter7/7_bgl/color_pickup.blend.
In this file, you can change the light color according to where you click.
from bge import logic
from bge import render
import bgl

cont = logic.getCurrentController()
lamp   = cont.owner
sensor = cont.sensors["s\_mouse\_click"]

if sensor.positive:
   width = render.getWindowWidth()
   height = render.getWindowHeight()
   viewport = bgl.Buffer(bgl.GL_INT, 4)
   bgl.glGetIntegerv(bgl.GL_VIEWPORT, viewport);
   x = viewport[0] + sensor.position[0]
   y = viewport[1] + (height - sensor.position[1])
   pixels = bgl.Buffer(bgl.GL_FLOAT, [4])

   # Reads one pixel from the screen, using the mouse position
   bgl.glReadPixels(x, y, 1, 1, bgl.GL_RGBA, bgl.GL_FLOAT, pixels)

   # Change the Light colour
   lamp.color = [pixels[0], pixels[1], pixels[2]]
There are three important bgl methods been used here. The first one is bgl.Buffer. It creates space in the memory to be filled in with information taken from the graphics driver:
viewport = bgl.Buffer(bgl.GL_INT, 4)
pixels = bgl.Buffer(bgl.GL_FLOAT, [4])
The second one is the bgl.glGetIntegerv. We use it to get the current Viewport position and dimension to the buffer object previously created:
glGetIntegerv(bgl.GL_VIEWPORT, viewport);
The buffer coordinates run from the left bottom [0.0, 0.0] to the right top [1.0, 1.0]. The mouse coordinates, on the other hand, run from left top [0, 0] to the right bottom [width, height]. We need to convert the mouse coordinate position to the correspondent one in the Buffer.
x = viewport[0] + sensor.position[0]
y = viewport[1] + (height - sensor.position[1])
The third one is bgl.glReadPixels. This is the method that’s actually reading the pixel color and storing it in the other buffer object:
bgl.glReadPixels(x, y, 1, 1, bgl.GL_RGBA, bgl.GL_FLOAT, pixels)
And, finally, let’s apply the pixel color to the lamp:
lamp.color = [pixels[0], pixels[1], pixels[2]]
blf - Font Drawing
If you need to control text drawing directly from your scripts, you may need to use this module. Be aware, though, that this module is a low-level API that has to be combined with the OpenGL wrapper to handle texts properly.
The blf module works in three stages:
Create a new font object.
Set the parameters for the text (size, position, and so on).
Draw the text on the screen.
Example: Writing Hello World
Open the file /Book/Chapter7/8_blf/hello_world.blend.
In the init function, we load a new font in memory and store the generated font ID to use later.
def init():

   """init function - runs once"""

   # create a new font object
   font_path = bge.logic.expandPath('//fonts/Zeyada.ttf')
   bge.logic.font_id = blf.load(font_path)

   # set the font drawing routine to run
   scene = bge.logic.getCurrentScene()
   scene.post_draw=[write]
The actual function responsible for writing the text is stored in the scene post_draw routine. Apart from the OpenGL calls, the setup for using the text is quite simple.
def write():
   """write on screen – runs every frame"""
   width = bge.render.getWindowWidth()
   height = bge.render.getWindowHeight()

   # OpenGL calls to re-set drawing position
   bgl.glMatrixMode(bgl.GL_PROJECTION)
   bgl.glLoadIdentity()
   bgl.gluOrtho2D(0, width, 0, height)
   bgl.glMatrixMode(bgl.GL_MODELVIEW)
   bgl.glLoadIdentity()

   # blf settings + draw

   font_id = bge.logic.font_id
   blf.position(font_id, (width*0.2), (height*0.3), 0)
   blf.size(font_id, 50, 72)
   blf.draw(font_id, "Hello World")
On the book files, in the same folder, you can find two other examples following the same framework: hello_world_2.blend and object_names.blend.