3D Basic Concepts
3D Basics
If you haven’t used any 3D application before, the terms modeling, animation, and rendering might be foreign to you. So before you go off to create the spectacular game that you always wanted to make, let’s have a quick refresher on the basics of computer graphics. You don’t have to endure the boring section below if you are already know what RGB stands for and the difference between Cartesian and Gaussian.
The knowledge in this section is universal and applies to all other 3D applications. So even if you are coming from a different application, the same concepts drive all of them.
Coordinate System
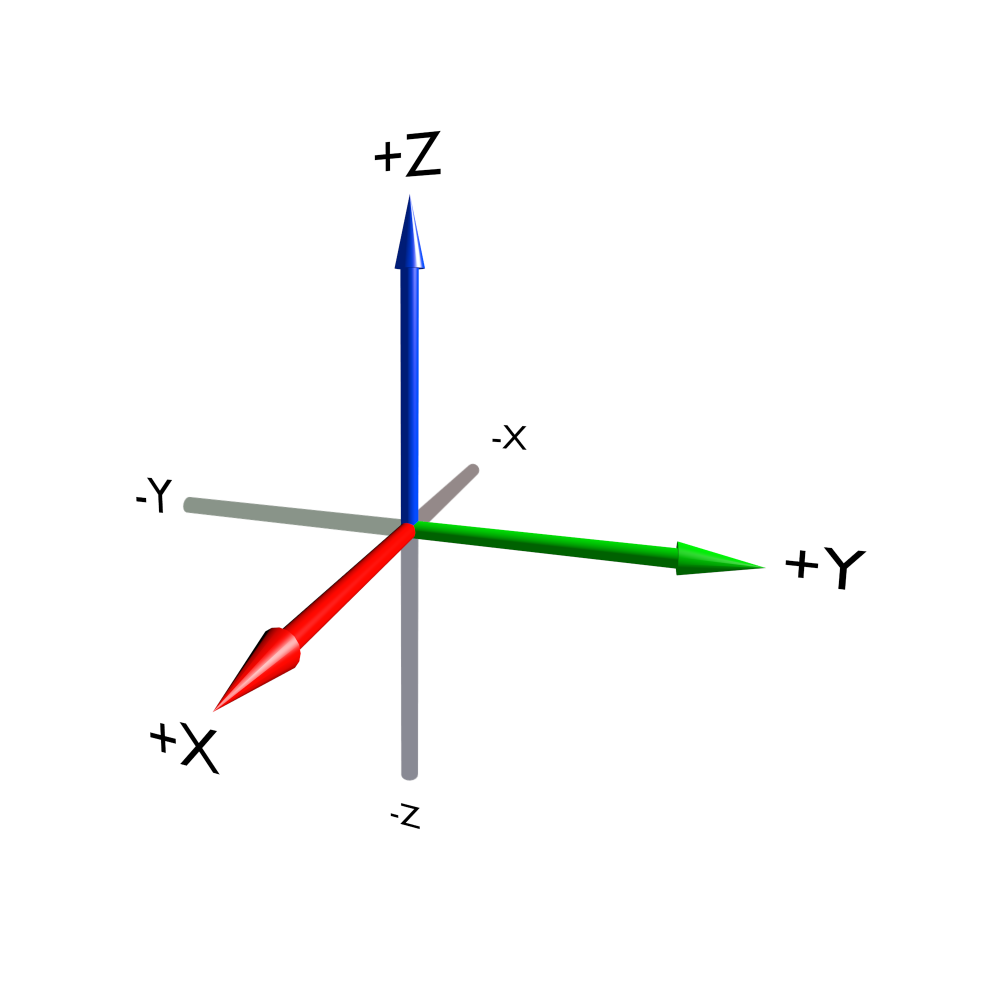
Coordinate system
We live in a three-dimensional world that has width, height, and depth. So to represent anything that resembles real life as a virtual world inside a computer, we need to think and work in three dimensions. The most common system used is called the Cartesian coordinate system, where the three dimensions are represented by X, Y, and Z, laid out as intersecting planes. Where the three axes meet is called the origin. You can think of the origin as the center of your digital universe. A single position in space is represented by a set of numbers that corresponds to its position from the origin: thus (2, -4, 8) is a point in space that is 2 units from the origin along the X axis, 4 units from the origin along the -Y axis, and 8 units up in the Z direction.
Points, Edges, Triangles, and Meshes
Although we can define a position in space using the XYZ coordinates, a single point (or a vertex, as it’s more commonly known in computer graphics) is not terribly useful; after all, you can’t see a dot that is infinitesimally small. But you can join this vertex with another vertex to form a line (also known as an edge). An edge by itself still wouldn’t be very visible, so you create another vertex and join all three vertices together with lines and fill in the middle. Suddenly, something far more interesting is created - a triangle (also known as a face)! By linking multiple faces together, you can create any shape, the result of which is called a mesh or model. Figure below shows how a mesh can be broken down into faces, then edges, and ultimately, into vertices.

Teapot, cube, face, edge and vertex
Why is the triangle so important? Turns out, modern computer graphics use the triangle as the basic building block for almost any shape. A rectangular plane (also known as a quadrangle, or more commonly a quad) is simply two triangles arranged side by side. A cube is simply six squares put together. Even a sphere is just made of tiny facelets arranged into a ball shape.
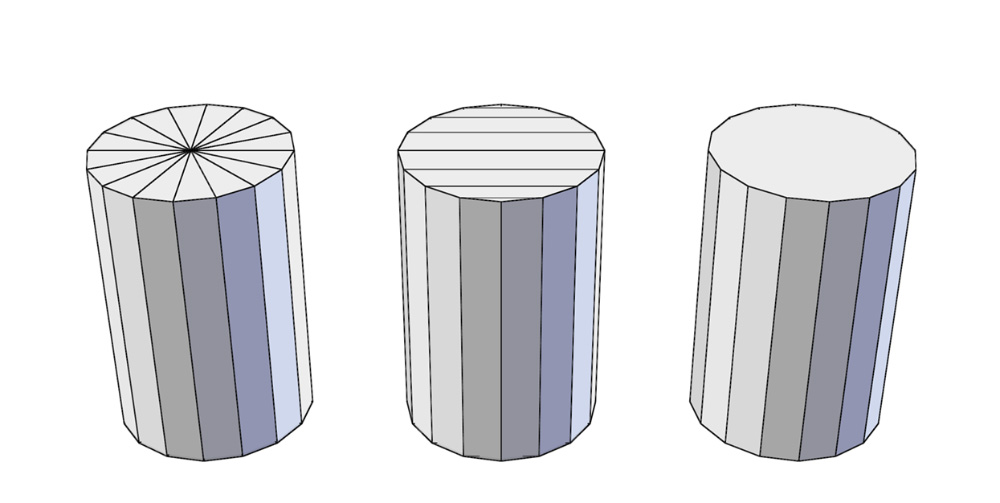
The cylinder cap can be made up of triangles, quads, or a n-gon
In Blender, a mesh can be made from a combination of triangles, quads, or n-gons. The benefit of n-gons is their ability to retain a clean topology while modeling. Without n-gons, certain areas of a model (such as a window on a wall) would require a higher number of triangles or quads to approximate, as shown below. While n-gons make modeling easier in some cases, Blender still converts them to triangles when you start the game.
The process of creating a mesh by rearranging vertices, edges, and faces is called modeling. Blender has many tools that help artists define the geometry they want.
It is worth noting that unlike the real world, polygonal models do not have volumes. They are just a shell made of interconnected faces that take the shape of the object, but the inside of the object is always “hollow.”
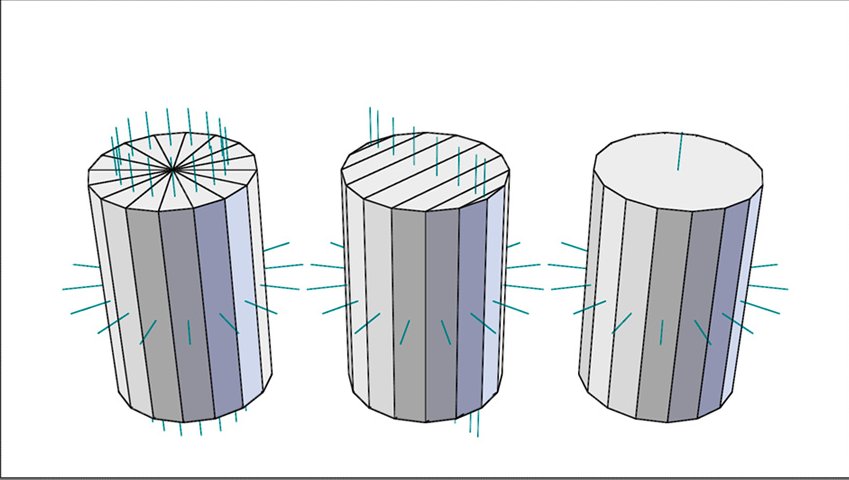
Surface normals are displayed as cyan lines protruding from the faces
Another concept that a modeler will likely encounter is surface normals, or “normals” for short. Normal is a property of each face that indicates the direction a polygon is facing. Because normals are used for shading computation of the surface, ideally all the normals for a mesh should be pointed “outward”. Wrongly oriented normals can cause the mesh to show up as black or invisible. Fortunately, there is a Make Normals Consistent function in Blender that can usually resolve the issue. Figure above shows how normals are presented in Blender.
Basic Transforms
The three basic transforms that you should be familiar with are:
Translation: The moving of an object in any direction, without rotating it.
Scaling: The resizing of an object around a point.
Rotation: The rotating of an object around a point.
These three are the most common manipulations you will encounter. They are illustrated below.

Translation, scaling, and rotation
Materials and Textures
Using polygons, you can define the shape of a mesh. To alter the color and appearance of it, you need to apply materials to the object. Material controls the color, shininess, bumpiness, and even transparency of the object. These variables ultimately all serve to add details to the object.
Often, changing the color is not enough to make a surface look realistic. This is where textures come in. Texturing is a common technique used to add color and detail to a mesh by wrapping the mesh with an image, like a decal. Imagine a toy globe: if you carefully peel off the paper map that is glued onto the plastic ball and lay it out flat on the table, that map would be the texture, and the plastic ball would be the mesh. The projection of the 2D image onto a 3D mesh is called texture mapping. Texture mapping can be an automatic process, using one of the predefined projections, or a manual process, which uses a UV layout to map the 2D image onto the 3D mesh. Figure below illustrates how an image is mapped onto a model.

Meshes with texture applied
Traditionally, a texture changes the color of a surface. But that’s not all it can do: textures can also be used to alter other properties of the surface such as its transparency, reflectivity, and even bumpiness to create the illusion of a much more detailed surface.
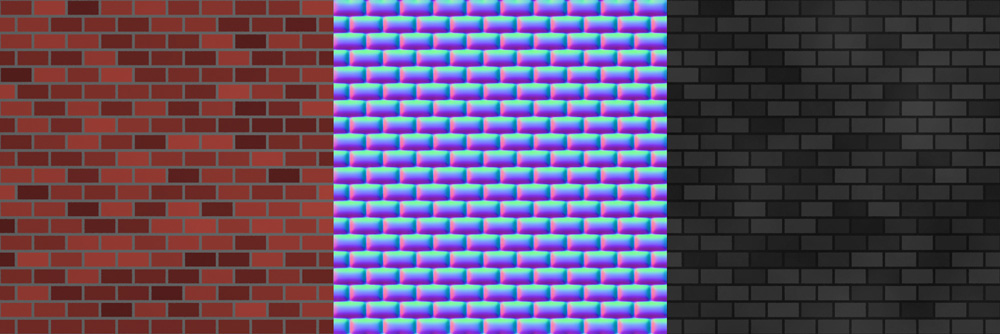
Diffuse map, normal map, and specular map
A diffuse map controls the base color of the surface. A normal map controls the surface normal of an object, creating a bumpy effect by changing the way the light is reflected off the object. A specular map controls the specular reflection of an object, making it look shiny in certain places and dull in others. A texture map can also have transparent pixels, rendering part of the object transparent.
Generally, textures are image files. But there are also other ways to texture a surface, such as using a procedural texture. Procedural texture differs from an image in that it’s generated by an algorithm in real time, rather than from a pre-made image file.
Lights
Everything you see is the result of light hitting your eyes-without lights, the world would be pitch black. Likewise, light is just as important in a virtual world. With light comes shadow as well. Shadow might not be something that you think about every day, but the interplay of shadow and light makes a huge difference in how the scene is presented.

Point, Sun, Spot and Area light
In most 3D applications, there are several different types of light available to the artist; each type has its advantages and disadvantages. For example, a spot lamp approximates a lamp with a conical influence; a sun lamp approximates a light source from infinitely far away. Lamps in Blender are treated like regular objects: they can be positioned and rotated just like any other object. Figure above shows how different lamps look in Blender.
Think of lighting as more than something that makes your scene visible. Good lighting can enhance the purpose of the scene by highlighting details while hiding irrelevant areas in shadow. Skillful placement of lighting also adds drama and realism to the scene, making an otherwise boring scene look visually exciting.
Camera
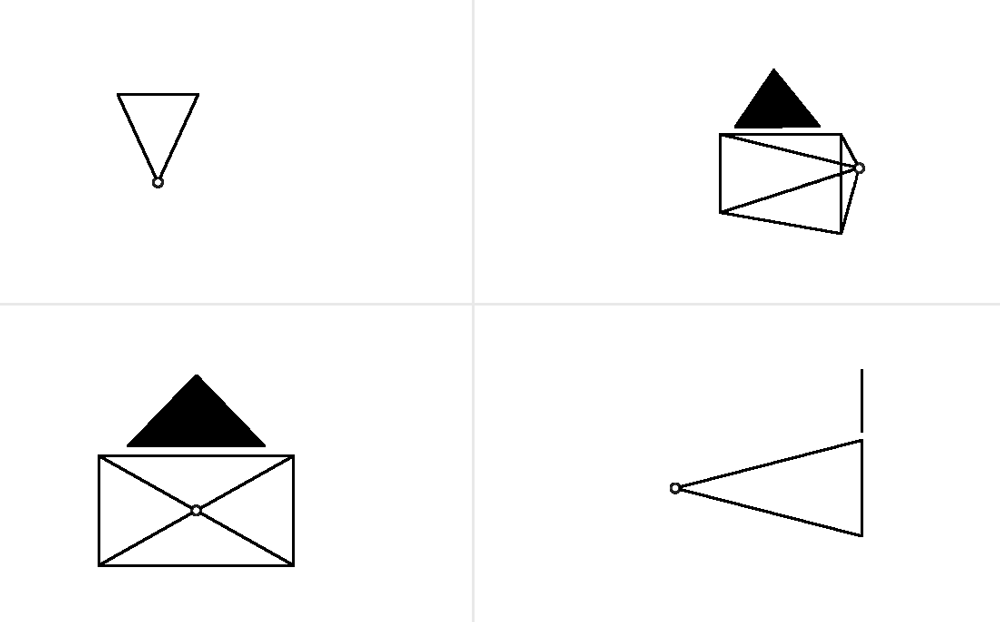
Camera object
When you are creating a 3D scene, you are looking at the virtual world from an omniscient view. In this mode, you can view and edit the world from any angle just like a movie director walking around a set in order to adjust things. Once the game starts, the player must view the game through a predetermined camera. Note that a predetermined camera does not mean the camera is fixed; almost all games have a camera that reacts to a player’s input. In an action game, the camera tends to follow the character from behind; in a strategy game, the camera might be hovering high above, looking down; in a platformer, the camera is usually looking at the scene from the side.
A camera is also treated as a regular object in Blender, so you can manipulate its location and orientation just as you can with any other object.
Animation
In this context, animation refers to the technique of making things change over time. For example, animation can involve moving an object, deforming it, or changing its color. To set up an animation, you create “keyframes,” which are snapshots in time that store specific values pertaining to the animation. The software can then automatically interpolate in between those values to create a smooth transition. The image below shows Blender’s Dopesheet Editor. The Dopesheet allows you to see the various properties that change during an animation: the horizontal axis represents time; the vertical axis shows the various properties, such as location or rotation that are keyframed.

Dopesheet Editor keyframes
The easiest way to animate is to alter the location, rotation, and scaling of an object over time. For example, by altering these variables, you can realistically animate the movement of a bouncing ball. Keep in mind that the curves represent the value of the channels (in this case xyz location) of the ball, not the actual motion path of the ball itself.
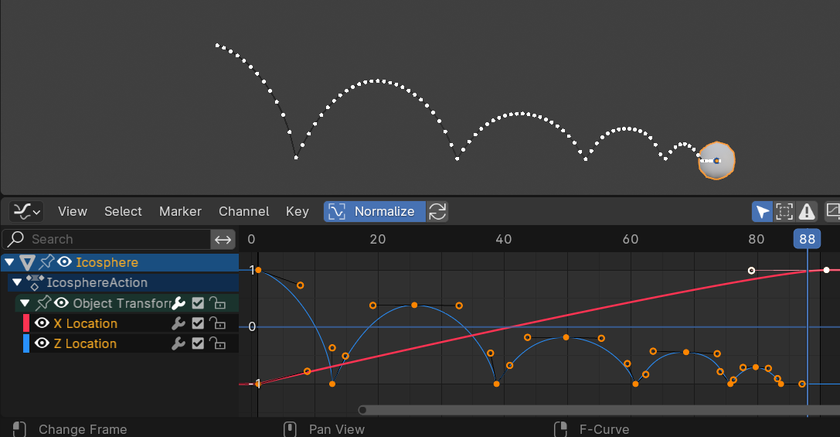
Bouncing ball animation
To animate something more complicated, such as a human, it’s not enough to just move, rotate, and scale the object as a whole. This is where armatures come in. Armatures are skeletons that can be “inserted” into a model to control the model’s deformation. Using this system, you can create complex yet organic-looking animations.
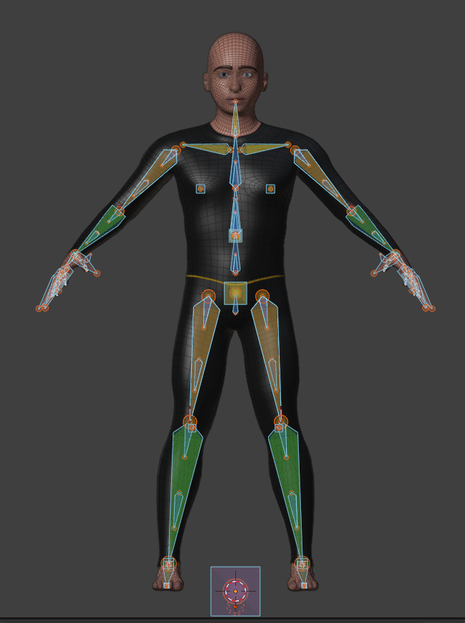
Armature animation
A third way to animate is using shape keys. Shape keys are snapshots of the mesh in different shapes. They are often used to animate nuanced changes that cannot be otherwise easily animated with armatures.

Shape keys animation
Finally, keep in mind that making objects move doesn’t always have to be a manual process. You can also make objects move by using the physics engine.
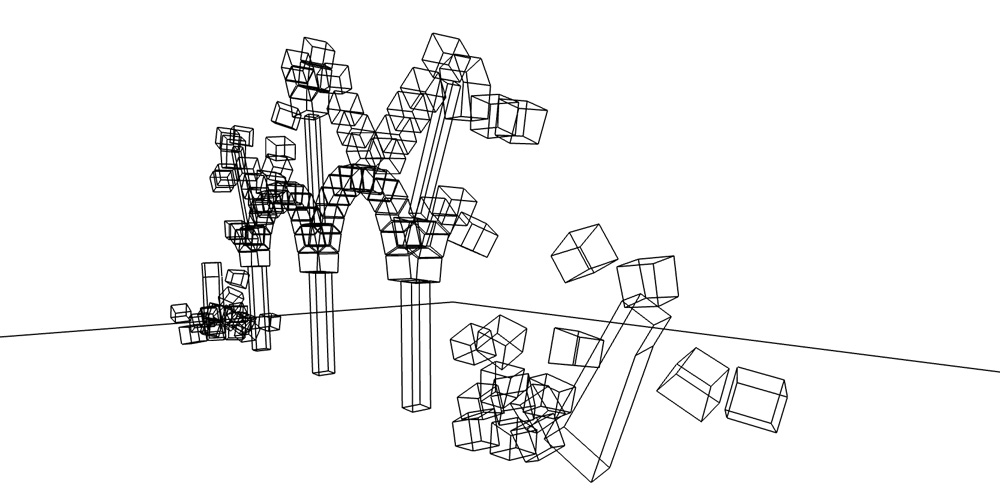
Procedural physics-based motion