3. Player Properties
Previously we added a single property to the player - running. In this chapter we will add some more properties, and use them with the game logic.
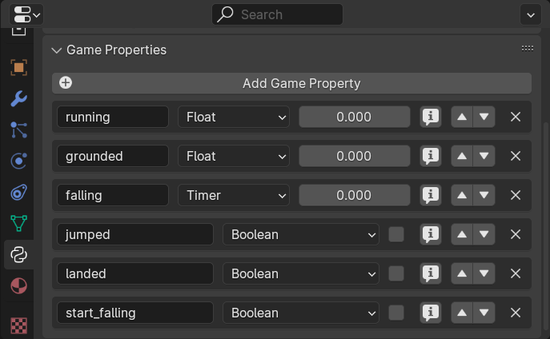
First, let’s add game properties to player.
>
grounded>Float>0.0(default values),falling>Timer>0.0,jumped>Boolean> unchecked,landed>Boolean> unchecked,start_falling>Boolean> unchecked.

Added player game properties
Next we add new logic tree, name it
player_2d_properties. Be kindly informed, this logic tree is a bit larger than previous ones. Did you remember to set ‘Fake User’?
Tip
It is recommended to switch to ‘fullscreen area/window’ mode - mouse over Logic Node Editor > Ctrl-Space (toggle fullscreen).
From left to right:
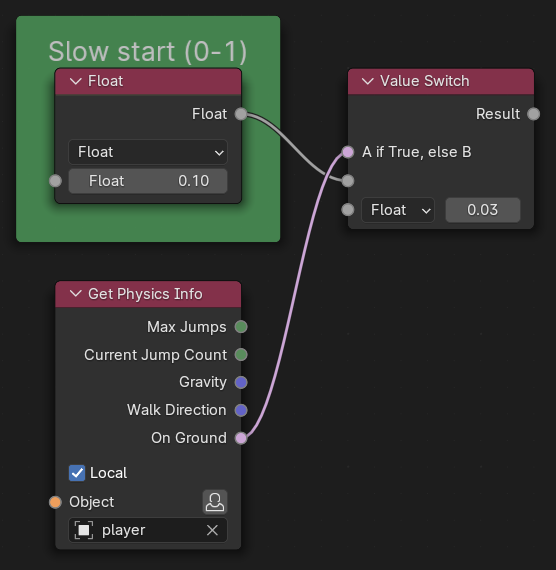
First we add Float, set its value
Float>0.1. If player is on the ground, this value will be used.Below it add Get Physics Info,
Object>player. This node will provide physics data for player.Next add Value Switch, connect Float to top
Type/Valueinput (second input socket from top), set bottomType/ValuetoFloat>0.03, and Get Physics InfoOn Ground>A if True, else B(top conditional input).

Player properties - first chunk of nodes
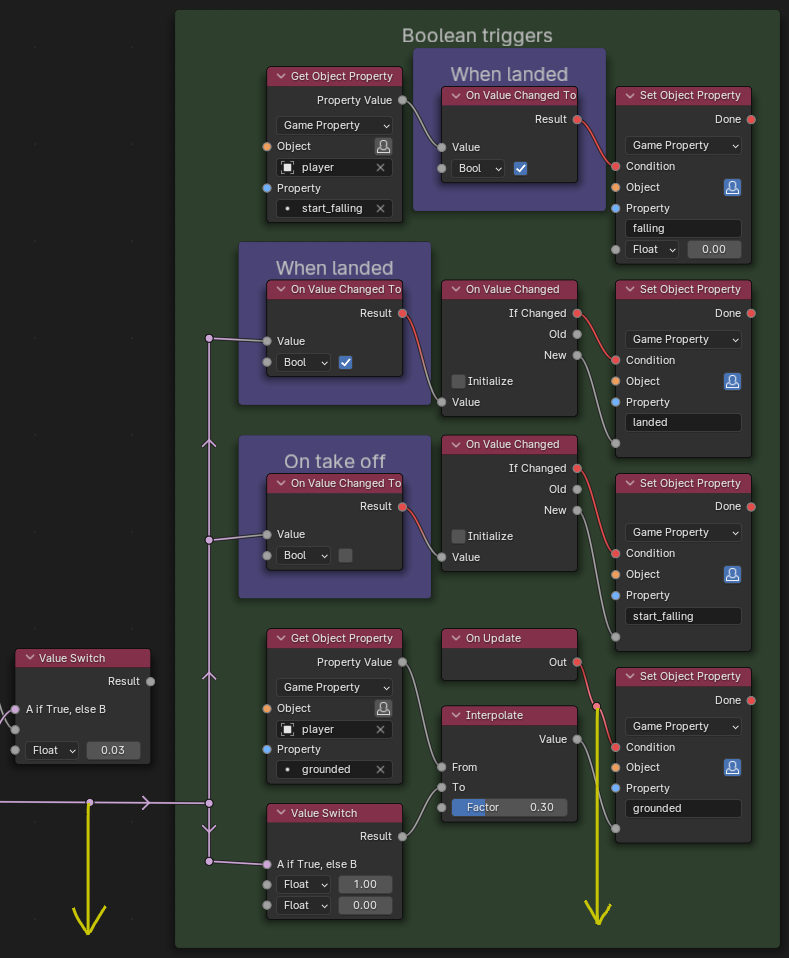
Approximately four node heights higher, we will start second nodes chunk. From now on, unless indicated otherwise, all Object fields should be set to player, and this will not be indicated for each node explicitly. Also previous node will be not named, just its output, for a sake of simplicity, except in case of ambiguity. If unclear, refer to relevant image, usually below the text.
Add Get Object Property,
Property>start_falling.Add On Value Changed To,
Property Value>Value,Boolchecked.Add Set Object Property,
Result>Condition,Property>falling,Float>0.0.
This is one row. Below it add another row.
On Value Changed To,
Boolchecked >Valueof On Value Changed,If Changed>Conditionof Set Object Property,Property>landed,New> bottom most input socket.
Copy last row one row below.
On Value Changed To
Booluncheck, Set Object PropertyProperty>start_falling.
One row lower:
Get Object Property
Property>Grounded, below it add Value Switch, bottom fieldFloat>0.0, next one aboveFloat>1.0, connectOn Ground>A if True, else B.Add Interpolate,
Property Value>From,Result>To,Factor>0.3.Above Interpolate add On Update,
Out>Conditionof Set Object Property,Property>Grounded.Also connect
On Ground> On take off & When landed (left-most, see image below)Valuesockets. Use Reroute utility, if you desire so.
Tip
Using Reroute utility
Shift-RMB over existing noodle, and you get Reroute socket for free. LMB the noodle from it just the same as you would from output socket, drag it to input socket. To move it around - LMB-select it, G to grab, move with mouse, LMB to ‘land it’ wherever you wish. Shift-Tab to toggle grid snapping.

Second chunk of nodes
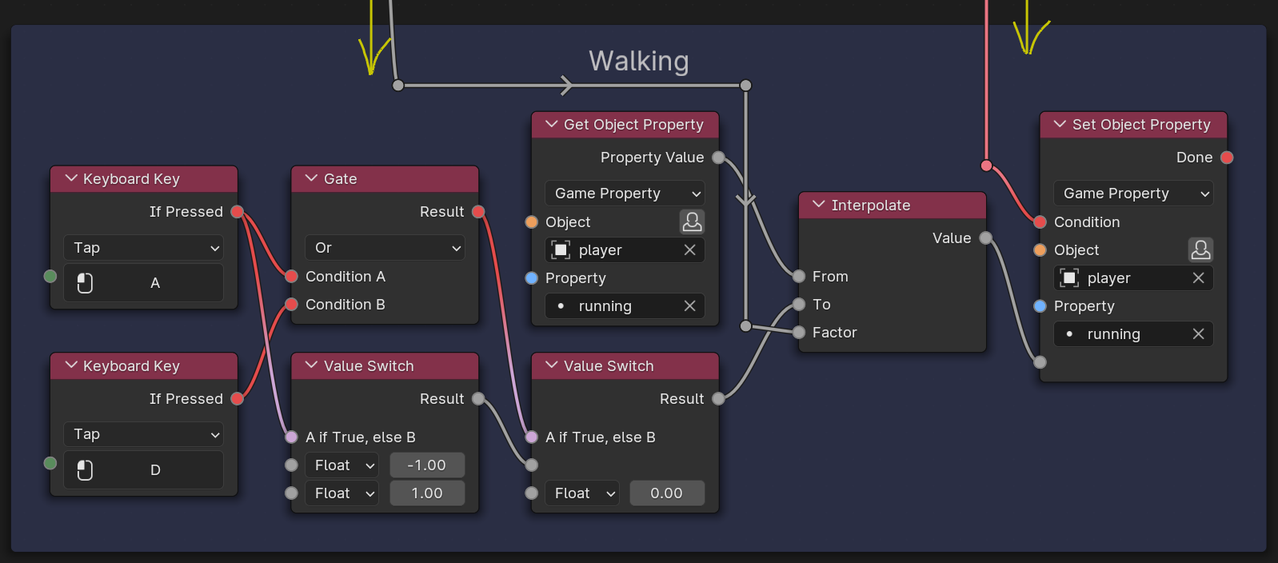
One but last chunk. This one is for player walking. Same as before - from left to right, below existing noodle soup, sorry, group.
Add 2 x Keyboard Key, one below the other, A for left, D for right movement.
Gate,
Gate Type>Or, connect the red dots.Below it, add Value Switch, bottom field
Float>1.0, field aboveFloat>-1.0,If PressedA>A if True, else B.Add/duplicate Value Switch, Gate
Result>A if True, else B,Result> next (middle) socket, bottom socketFloat>0.0.Above last node add Get Object Property,
Property>running.Next Interpolate,
Property Value>From,Result>To, first Value Switch` >Factor.At the end, Set Object Property, from above On Update >
Condition,Property>running,Value> bottom input socket.

One-but-last chunk of nodes
Ignore left yellow arrow in above image, this connection is not from On Ground.
And the last chunk, this one for jumping.
Keyboard Key,
Spacefor jumping.Gate, above Get Physics Info
On Ground>Condition A,If Pressed>Condition B.Jump,
Result>Condition.On Value Changed,
Done>Value.Yes, last one, Set Object Property,
If Changed>Condition,New> bottom-most input socket.
Yes, finally, we are done with this logic tree.

The last chunk
Next we add player animations, so it will look like it is walking.