First Person Shooter
In this tutorial we will:
Open .blend file with level assets - barrels and cubes, a brick walls, and a player with camera;
Use Logic Nodes to add W S A D movement and a jump with some extras;
Upgrade with Logic Nodes into a FPS game;
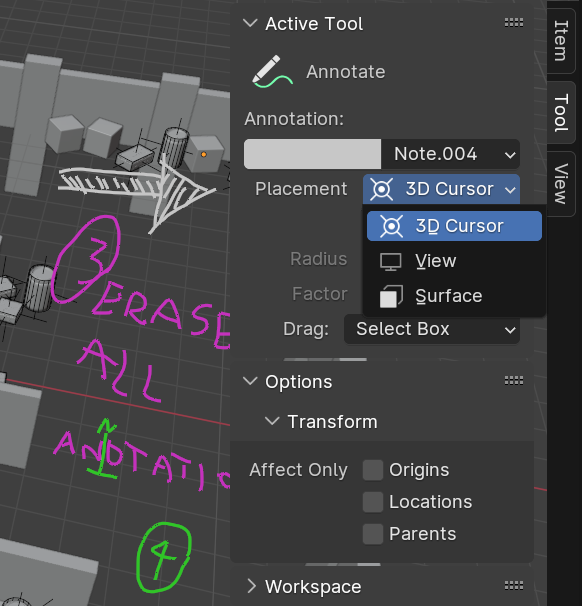
Placement options for Annotation tool
We will also learn few handy shortcuts on-the-go. Shall we?
Download/open level with assets .blend file. Follow the instructions precisely. :)
Shift-Space > D for on-screen scribble tool, called Annotation in blenderland.
Annotation tool is useful for quick sketch, storyboard, and transferring ideas to collaborators. Also for annotations. He he he. Try all three options for Annotation tool, rotate 3D viewport in-between, to see different placements of your scribbles. Go to and select individual colors to be able to erase them. Or click to delete all at once quickly.
Ok, enough chit-chat - let’s fight!
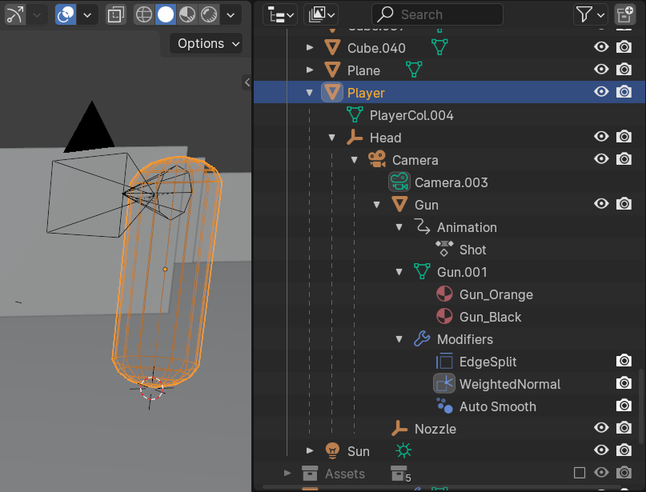
Player as parent of many children
In Outliner Editor top > search for Player.
Take a look of the level objects, particularly the hierarchy of Player object. Below Player object there is a bunch of other objects, being a children of Player, our main Parent object. Wherever Player goes, all children will follow. Also take a look at Properties Editor - under Object tab (orange square) there are Relations and Collections sub-panels, and close to the bottom, a Viewport Display sub-panel - under Display As a is selected, and this is why Player looks underfed, sorry, wireframed. Since during the gameplay the Player is actually not visible, this will save some computer power. Not much though. :)
Of our main interest is a Head object, which is of type Empty object - those are commonly used as Parent object. In our case, Head is a parent of Camera object - this is the “eyes” of our player. No camera - no image on our screen.
Next, under the Camera, there is a Gun object, and this one has an Animation object with Action assigned to it.
Those are main building blocks of the game development, which we will incorporate into Logic Nodes workflow. Let the party begin!
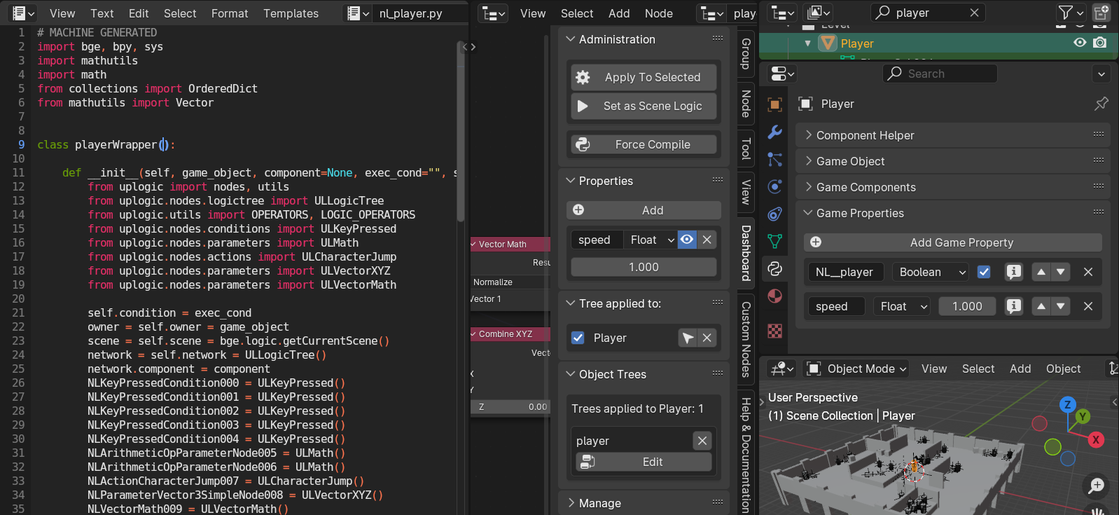
Delete Text object (it was showing > W to exit Annotation tool), we do not need it. Switch to Logic Nodes workspace (top-most header). Arrange the editors as you see fit, the one we will use most is Logic Node Editor.
Tip
Both game and 3D model development require use of multiple editors at once. This can clutter the screen, particularly small one, quickly. To remedy this, few workflows are at our disposal.
Dedicate each workspace, like default Blender startup file. In this case there are workspaces, which can be switched by clicking top-most header, in our example:
There is also tab, if you want to add another workspace. And you can assign hotkeys for switching previous/next workspace: - search for
Screen > Cycle Workspace. Assign 2 keyboard keys, one for previous and one for next workspace.
I trust you can figure out how to delete a workspace by yourself.
Use Blender/UPBGE handy shortcut, Ctrl-Space, which will toggle-maximize the editor window under the mouse cursor. This was a preferred workflow of now late Johnny Maccarony, world-known heavy consumer of Logic Node noodles.
In Logic Node Editor, first create new logic tree, click Logic Node Editor, rename to player, and mark Protected (Fake User); next add basic movement nodes, same as for Moving A Cube chapter.
Add 5 Keyboard Key nodes, assign D A W S keys for right/left and forward/backward movement, and Space for jumping.
Add 2 Math nodes and connect with above 4 movement nodes.
Add Apply Force node, connect remaining Keyboard Key node
If Pressedoutput socket toConditioninput socket, addPlayeras object, setvector Z(up/down axis) to200.0- this much force will be applied.Local? Judge yourself, or use time-tested very successful procedure - trial & error. Lucky you, just 2 options are available.Add Combine XYZ node, connect above Math nodes. Leave Z at default 0.0 value.
Add Vector Math node, set to
Normalize, connect those 2 cute blue-ish dots.Add another Vector Math node, set Operation to
Scale. This node will determine speed of the Player. ConnectResultfrom above node toVector 1input socket.
Tip
If you want nodes to be aligned, turn on magnet icon in top-right corner of Logic Node Editor, above N-panel. Nodes will now snap to invisible grid. Hotkey is Shift-Tab.
Add Game Property and Apply To Selected
Before we continue with nodes, we need to add Game Property. With Player selected:
In , click , name it
speed, leave defaultFloattype, and set value to1.0.
- this will create NL__player game property, player object tree, and a nl_player.py script. NL/nl stands for node logic.
Good job. Now we can continue with nodes.
Add Get Object Property node; if not already, select
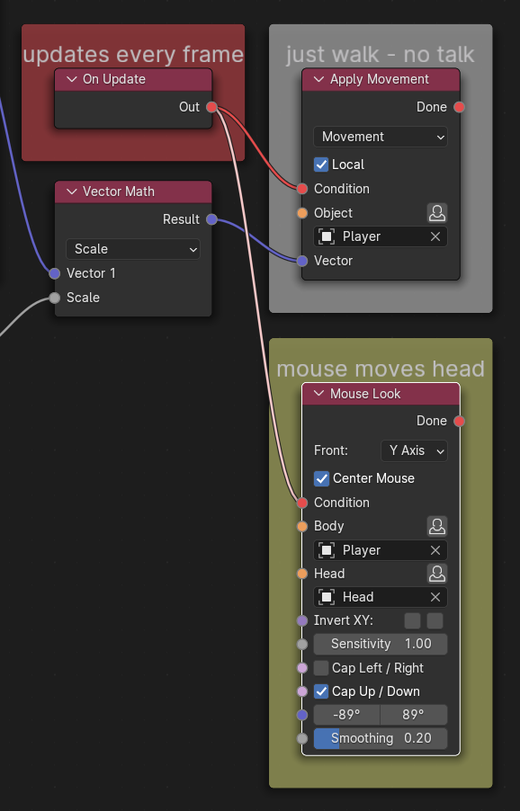
Game Propertyfrom dropdown, and inPropertyfield typespeed- this is the speed property that we just created above. Connect this node toScaleinput socket of the last Vector Math node, and addPlayeras owner object - click and select from menu.Add On Update and a Apply Movement node - connect
OuttoCondition, and last Vector Math intoVector; also setPlayeras object, and yes, checkLocal.
This is our node setup so far:
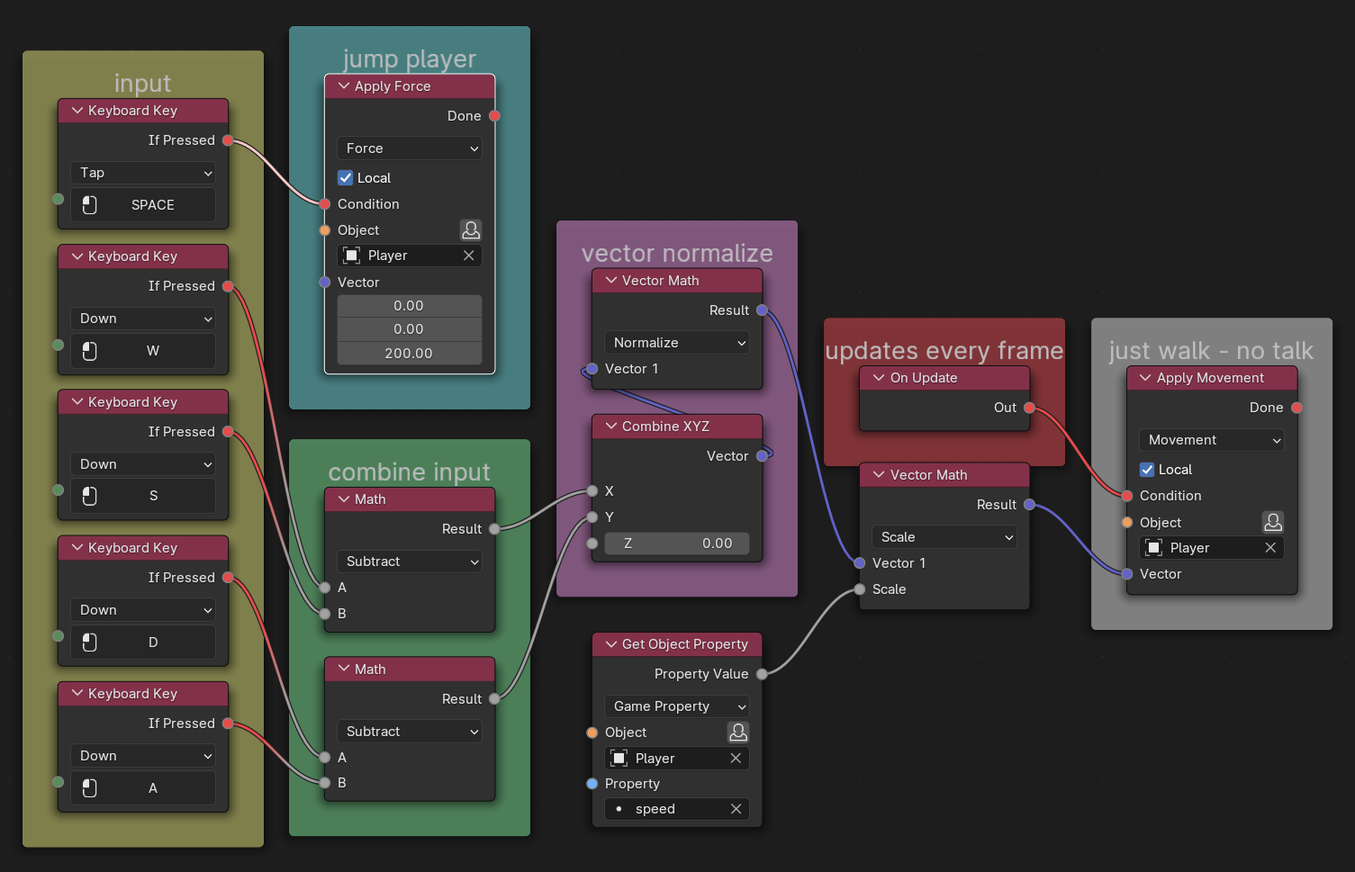
Player movement nodes setup so far
Tip
Another very useful Blender habit to grow - almost all buttons & commands have option to Add to Quick Favorites or Assign Shortcut:
Go to ;
Hover mouse over button, RMB and select
Add to Quick Favorites.Use this tip whenever you find yourself using/repeating same actions over and over. It is a great time saver.
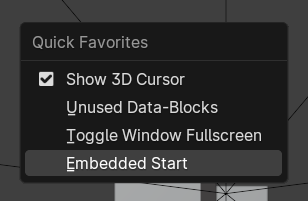
Q for Quick Favorites > E for Start
According to the Holy Blender Bible, Embedded Start can be invoked with hotkey P, which seems to be not working in current UPBGE by default. So we added it into Quick Favorites, although we could as easily assign a P shortcut. We will now run game and test if node setup is working as expected. With mouse over 3D-Viewport:
Numpad 0 > Home > Q will move into ‘camera view’ > zoom-in/maximize/center the camera view > open Quick Favorites menu; there, another hotkey is offered for the Embedded Start - this depends on various factors, and is recognizable by any of the letters being underscored - E in figure; in your case might be something else. Pressing that key should start the game. Esc to end the game.
While the game is running, press movement keys and observe Player behavior.
First of all, it is moving way to fast > reduce the
speedproperty; trial & error is the name of the game, until you find comfortable settings. Hint - halve the speed value for a start, and do not forget - Player should be selected in order to change its speed property.Second of all, keys are wrong > fix them until character moves properly relative to pressed keys > W forward; S backward; A left; D right.
Mouse Look settings
If you’re done fixing, let’s continue.
Add Mouse Look and connect
Outfrom On Update toCondition, setPlayerasObjectandHeadasHead. Run the game, test, if needed, adjust settings in Mouse Look node:Cap Up/Downwill limit Head movement,Smoothingwill smooth mouse moves.
Next we upgrade walking to run:
Add/duplicate Keyboard Key & Math, add Value Switch. The logic here is:
When Shift is pressed, add some float value to speed, and use resulting value for movement;
If not pressed, use existing speed value.
Test the game, adjust values as you see fit.
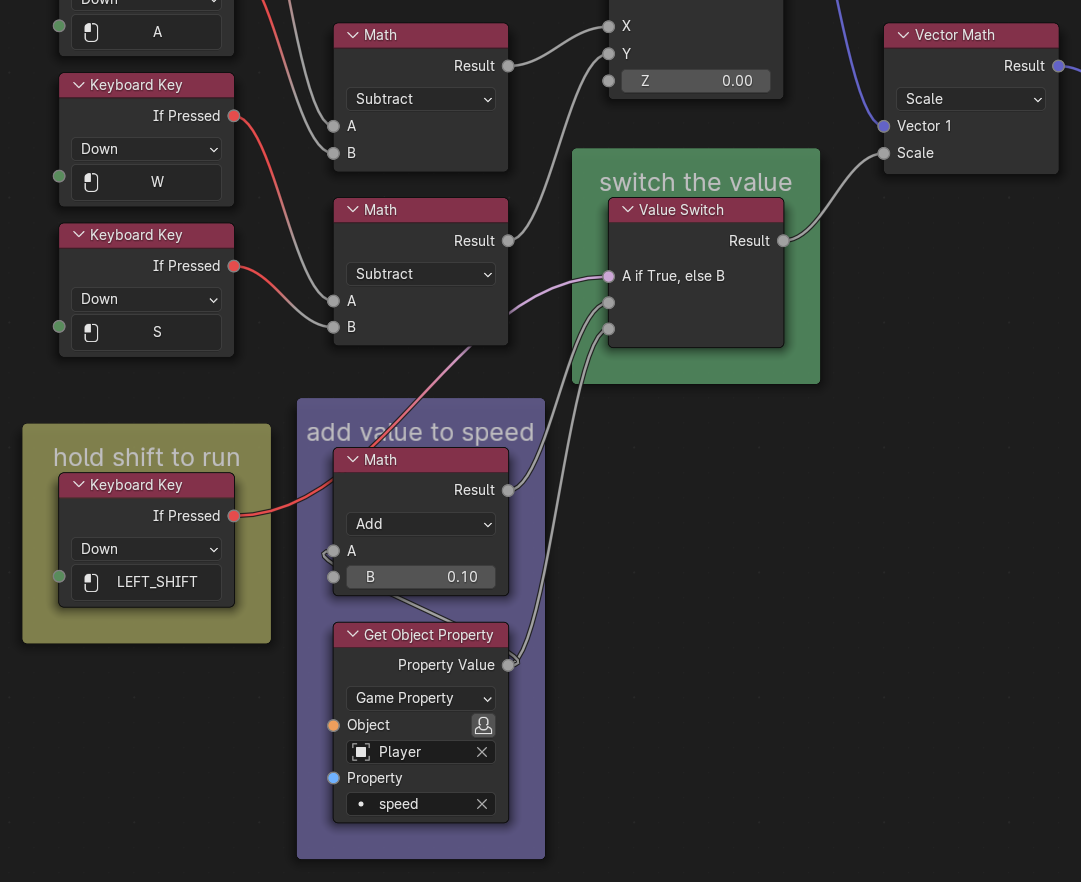
Value Switch for running
Now it is time for some actions - we’ll add gun shooting. Switch to workspace, in the left editor/window > top-right, check Shading options - little arrow at far right side will dropdown some setting, which you are free and advised to change.
Tip
With object selected, you can ‘focus’ it with Numpad , (comma); this works in , , and other editors. Use this if you ‘loose’ the object from sight.
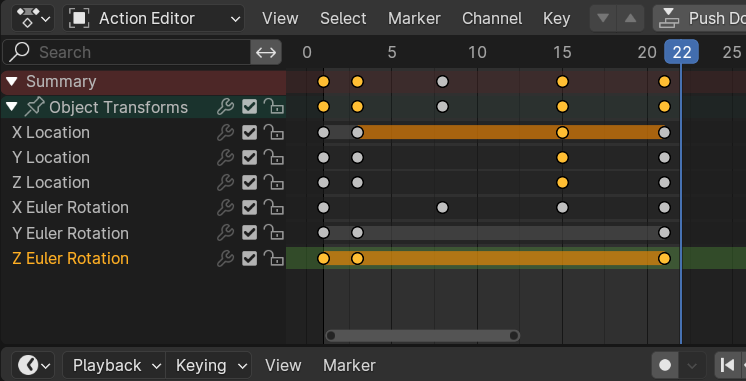
Action Editor context with action dots
Expand/enlarge bottom , select/expand
Gunobject (Outliner > Search if needed), and you shall see some orange dots in Dope Sheet - this is gunAction- when gun is fired, bullet pushes it back and up. Hit Space to toggle animation playing. We need to attach this action to Player and connect it with an input.Switch Editing context from to - name of our action is shown in the header >
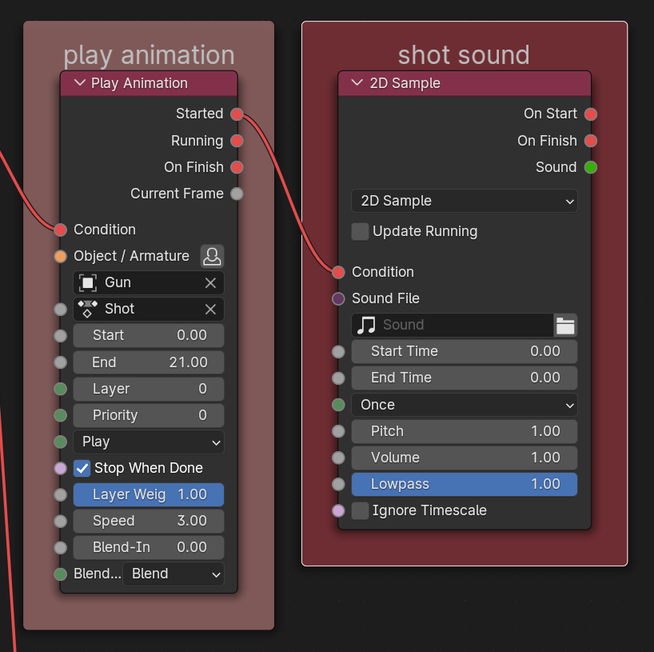
Shot.Back to workspace (or modify workspace to include Logic Node Editor window/area). Add Mouse Button, Pulsify, Stop Animation and Play Animation nodes, connect them red-to-red dot.
Shotaction is how long? Set Play Animation toObject>Gun, andAction>Shot,End> last action frame. Test the game, adjust settings.
Gun is moving when shooting now, but still needs to actually shoot something. And the sound is missing.
Add below Active Camera, Get World Position, and Get Axis Vector - connect
Camerato both Get World Position >Object, and Get Axis Vector >Object, setAxis>-Z Axis(object/player forward-facing direction).Get Axis Vector will take Active Camera orientation and feed it to Raycast for aiming direction.
Get World Position will take Active Camera (player body/head) position and feed it to Raycast as shooting origin point/position.
Add Raycast, connect Get World Position >
Origin, Get Axis Vector >Aim, and above Stop Animation >Condition, checkCustom DistanceandLocal.Add Apply Impulse, connect Raycast top two output sockets color-to-color, and
Picked Point>Vector,Ray Direction>Direction.Add Draw node, set to
Cube, connect Apply Impulse >Condition, RaycastPicked Point>Origin, setWidthto something small, i.e. 0.02, and checkUse Volume Origin.Cubewill act as improvised bullet. In final game this bullet would probably best be hidden.
Done - test and adjust settings.
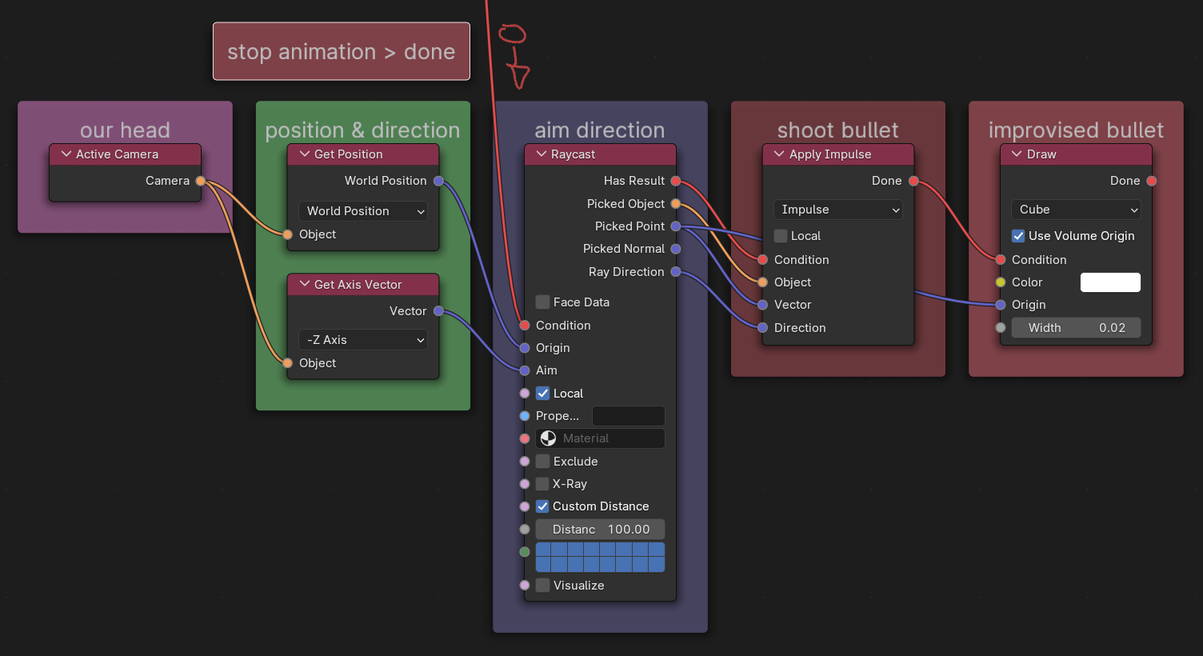
Shot action nodes
Shot audio clip node
Final touch:
Search/download ‘machine gun shot single audio’, a short sound clip, save to disk, somewhere close to our working .blend file.
Next to above Play Animation add Start Sound, set as
2D Sample, connect Play AnimationStarted>Condition,Soundattribute > folder icon > load shot audio clip, note icon > load from dropdown. Test the game, take a break.