Preparation
Many times free asset files are available on Internet, for you to be used freely, as a starting point. They may include single object, i.e. a spaceship, or complete levels with hundred of objects. In both cases, they are usually poorly organized, with unclear names, and also often with missing data, mostly materials.
If we want them to be better organized, some renaming and cleaning is necessary. This becomes very important when game includes many scenes or levels. Let’s see how this can be achieved efficiently.
Note
Naming Conventions
There are many naming conventions in computer programming - snake_case, camelCase etc. We use snake_case in our tutorials.
Keyboard
It is assumed that reader has a keyboard with Numpad - using Blender/UPBGE, this is highly recommended.
In our .blend assets file, find a player object. Not a simple task, since there is no object with that name - names in Outliner are all cryptic/default. Although there is a hint, if you search the Outliner, we’ll assume this is not the case.
Switch to workspace, select the ‘egg’ object.
Mouse-over Outliner > Numpad , (comma) - currently selected object is focused in Outliner. Rename to
playeror whatever you prefer. This works also in reverse - select object in Outliner > mouse-over3D Viewport> Numpad ,.
Next, there are many objects with same name (except for end numbering). Let’s rename those too. Lucky we, Blender has a built-in tool for batch renaming.
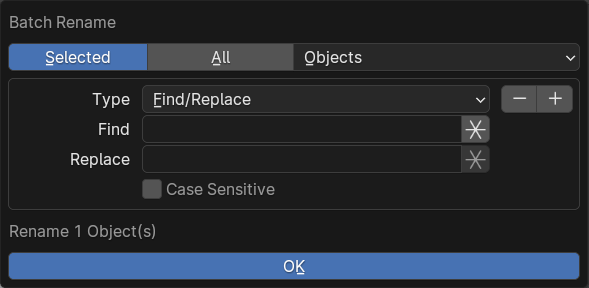
Batch Rename window
3D Viewport> click big object (rock) under player, and find it in Outliner (hotkey above) - should be named ‘Icosphere.002’.F3 for Search pop-up > type ‘batch rename’ > Enter (there is also hotkey indicated in Search pop-up).
Search pop-up > (also hotkey is indicated - Alt-A). If you want to only rename selected objects > .
Leave next field as ‘Objects’, since we are renaming objects. But do feel free to explore other available options in dropdown menu. This goes for next ‘Type’ field too.
‘Find’ field > type ‘icosphere’ ( is unchecked) > ‘Replace’ field > type ‘big_rock’ (or whatever you prefer). For the sake of this tutorial, we will rename the Cube objects at the same time.
Click button at the right side - this will add another sub-window. ‘Find’ > ‘Cube’ > ‘Replace’ > ‘rock’. Hit .
The result is not ok, because we also renamed all trees into rock. Ctrl-Z few times to undo. You now know how to quickly rename objects. If you want to do it properly:
Shift-select all trees in 3D Viewport > Batch Rename > ‘Selected’ > ‘Find’ > ‘cube’ > ‘Replace’ > ‘tree’. Repeat for big rocks and small rocks, rename accordingly.
Tip
Can not zoom enough
Blender will sometimes not zoom enough into the object. Solution: select an object > Numpad , - object is centered and focused, now you can zoom in. This procedure works best with single object selected.
Let’s move on.
Adding Game Logic
In general, it is recommended that game logic is split into small chunks/logic trees - this way it is easier both to write and to manage a game logic.
For above reason, we’ll altogether add five logic node trees:
Camera movement;
Player movement;
Player properties;
Player animations;
Movement sounds.